
Introduction to 29 Handy Outdoor Bathroom Designs for a Backyard Transformation
Are you dreaming of adding style, function, and a touch of luxury to your outdoor space with 29 Handy Outdoor Bathroom Designs for a Backyard Transformation? This guide walks you through everything you need to know to plan, build, and enjoy a backyard bathroom that is practical, beautiful, and budget-friendly. Whether you want a full outdoor bath, a compact changing room, or a rustic shower stall, these designs show how clever planning and DIY skills can turn leftover yard space into a relaxing retreat. Imagine stepping outside to rinse off after a swim, giving guests a private place to freshen up during garden parties, or adding a unique selling point to your home — all without breaking the bank.
This build concept shines because it balances aesthetics with practicality: durable materials, straightforward joinery, and clever drainage can make a tiny outdoor bathroom last for years. Time commitment varies by design choice; simple shower stalls or composting toilets can be completed over a weekend, while full-feature outdoor bathrooms with plumbing may take a few weekends or require a pro for final hook-ups. Costs range widely, from under a few hundred dollars for the simplest setups to several thousand for fully plumbed rooms with tiled surfaces and lighting. Skill level is equally flexible — many designs are weekend-friendly for intermediate DIYers but can be scaled up or down for beginners or pros.
Planning for weather exposure, ventilation, and privacy is key in outdoor builds, and that’s where these 29 Handy Outdoor Bathroom Designs for a Backyard Transformation truly help. In this article you’ll find clear specs, material lists, safety tips, and a step-by-step build you can adapt. Before you start, measure your site, check local codes for setbacks and septic/plumbing connections, and decide whether you want a permanent structure or something portable. If you’re considering landscaping integration, see these small backyard landscaping ideas for inspiration that pairs beautifully with an outdoor bathroom.
Table of Contents
Key Benefits of 29 Handy Outdoor Bathroom Designs for a Backyard Transformation
Why You’ll Love This Build
- Adds convenience for pool or hot tub users and outdoor entertainers.
- Can increase property appeal with a unique, functional outdoor amenity.
- Offers flexibility: portable, semi-permanent, or fully plumbed permanent options.
- Saves indoor space and reduces wear on the interior during high-traffic outdoor events.
- Uses affordable materials like cedar, composite decking, or reclaimed wood for a cost-efficient build.
- Encourages healthy outdoor living and can be integrated with landscaping to boost privacy.
What Makes It Stand Out
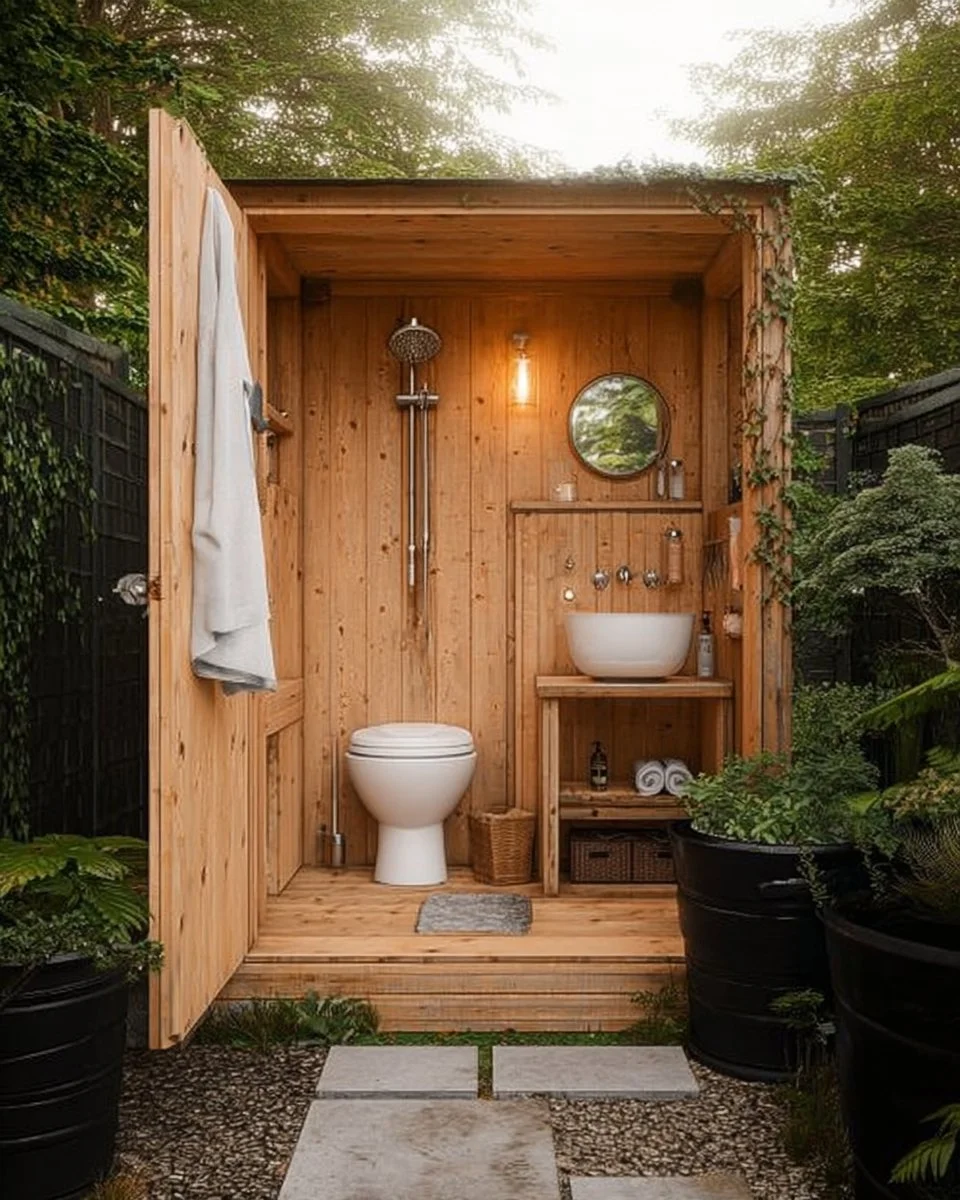
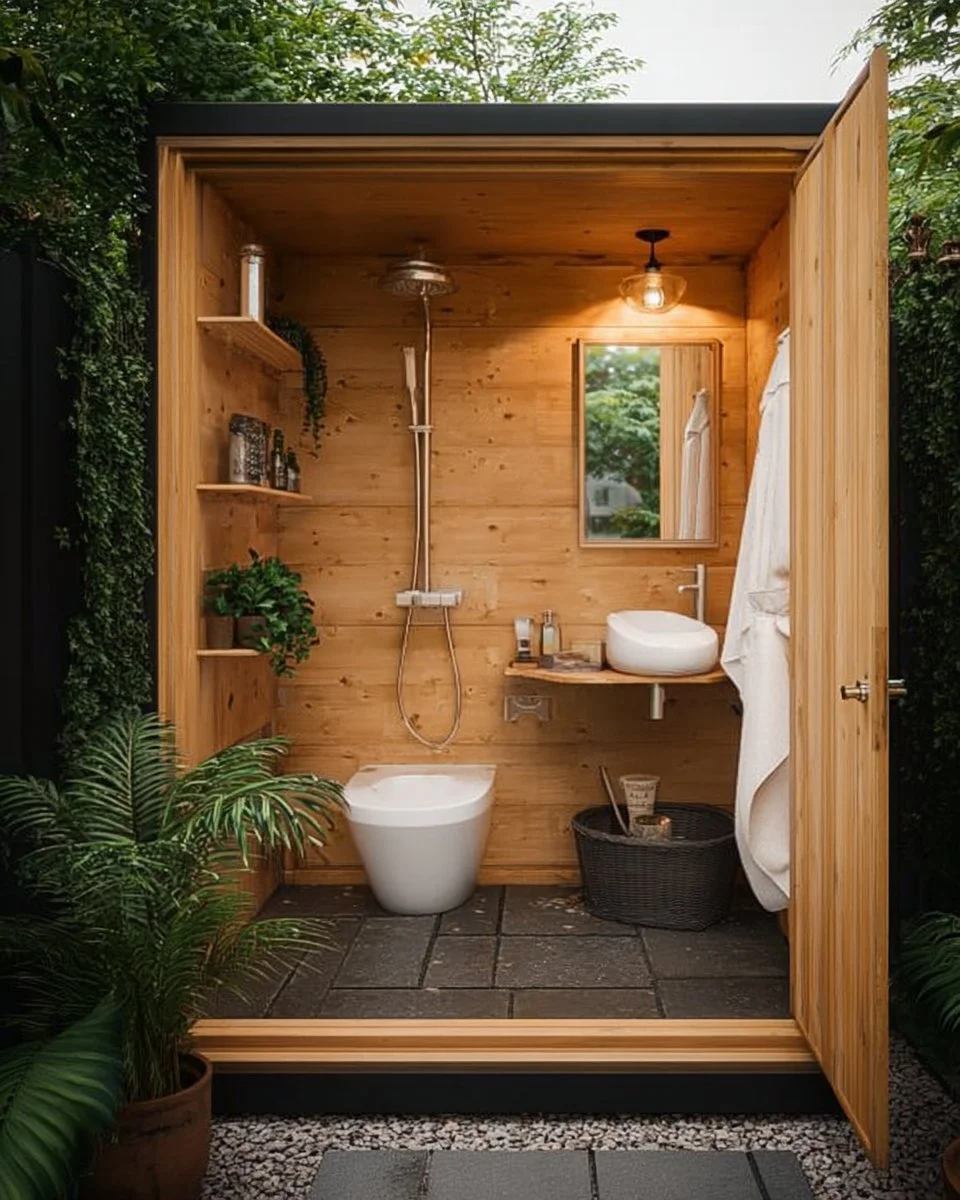
These 29 Handy Outdoor Bathroom Designs for a Backyard Transformation stand out because they are curated to suit a wide range of yards, budgets, and DIY skill levels. Instead of one-size-fits-all plans, the designs include minimalist changing stalls, enclosed showers, charming shed-style bathrooms, and composting toilet solutions. Each option prioritizes drainage, ventilation, and privacy in ways that store-bought kits often overlook. Customization is central: you can choose a modern, sleek look with powder-coated metal and tile or a rustic cabin feel using rough-sawn cedar and slate. Where the project truly excels is in adaptability; plans can be sized up for an all-season bathhouse or scaled down for seasonal poolside convenience.
Project Specs for 29 Handy Outdoor Bathroom Designs for a Backyard Transformation
At-a-Glance Details
Skill Level: Beginner to Intermediate (advanced for full plumbing)
Estimated Time: 1 weekend for basic stalls, 2–4 weekends for fully plumbed rooms
Estimated Cost (USD): $200–$5,000 depending on complexity and materials
Dimensions: Typical footprint options: 3′ x 3′ (0.9 m x 0.9 m) for a changing stall, 4′ x 6′ (1.2 m x 1.8 m) for shower, 6′ x 8′ (1.8 m x 2.4 m) for small bathhouse
Indoor/Outdoor Suitability: Outdoor (seasonal or year-round with proper insulation and plumbing)
Tools Needed at a Minimum: Circular saw, drill/driver, tape measure, level, clamps
Materials and Tools for 29 Handy Outdoor Bathroom Designs for a Backyard Transformation
Complete Materials List with Measurements
- Pressure-treated 2×4 lumber — 8 pieces at 8 ft (2438 mm) for floor joists and wall framing.
- Cedar 1×6 tongue-and-groove boards — 20 ft (6096 mm) total for cladding (cedar resists rot outdoors).
- Composite decking boards — optional, 4 boards at 12 ft (3658 mm) for flooring.
- Exterior-grade plywood 3/4″ — 2 sheets (1220 x 2440 mm) for flooring subbase and wall sheathing.
- Galvanized or stainless-steel screws: #8 x 1-1/2″ and #10 x 3″ — 200 pieces.
- Joist hangers and hurricane ties — as required by the frame design.
- Exterior caulk and construction adhesive — 1 tube each.
- Waterproof membrane or pond liner — enough to cover the floor area plus overlaps.
- Gravel and drainage pipe — 2 bags of 3/4″ clean gravel and 10 ft (3 m) of 4″ perforated pipe for subfloor drainage.
- Roof corrugated polycarbonate or metal panels — measured to roof area (e.g., 20 sq ft / 1.86 sq m).
- Hinges and latch for door — 1 set stainless steel.
- Exterior paint, stain, or clear sealer — 1–2 quarts depending on finish.
- Vent louver or small extractor fan — 1 unit for ventilation if enclosed.
- Optional: composting toilet unit or RV-style cassette toilet — 1 unit if choosing off-grid sanitation.
Complete Tools List
- Circular saw with plywood blade (budget alternative: handsaw for straight cuts, slower).
- Cordless drill/driver with Phillips and square bits.
- Jigsaw for curved cuts and notches.
- Impact driver for screws (equivalent: drill with clutch).
- Orbital sander with 80/120/220 grit pads.
- Tape measure (25 ft / 7.5 m), speed square, and carpenter’s pencil.
- Level (48″ recommended) and plumb bob.
- Clamps (bar or pipe) 2–4 pieces, 24″ minimum.
- Safety gear: eye protection, hearing protection, dust mask or respirator, work gloves.
- Caulking gun, utility knife, and paint brushes or sprayer.
Substitutes and Alternatives
If cedar is too expensive or unavailable, pressure-treated pine with an exterior-rated stain is a budget-friendly substitute though it will require more frequent maintenance. Composite decking can replace wooden floors for low maintenance and slip resistance but be mindful of expansion gaps and manufacturer fastening systems. For roofing, corrugated metal offers long life and a modern look; polycarbonate sheets are lighter and allow natural light. For sanitation, a simple portable or composting toilet is an effective off-grid option that avoids excavation and ties into no municipal plumbing. If you lack an impact driver, a high-torque cordless drill with appropriate bits can suffice for most fasteners; just pre-drill larger screws to avoid stripping.
Cut List and Measurements for 29 Handy Outdoor Bathroom Designs for a Backyard Transformation
- Floor joists: 2×6 PT lumber, 6 pieces at 6′ (1829 mm). Note: space joists 16″ OC and orient crown up.
- Rim joists: 2×6 PT, 2 pieces at 3′ (914 mm).
- Subfloor: Exterior-grade 3/4″ plywood, 1 sheet cut to 3′ x 6′ (914 x 1829 mm).
- Wall studs: 2×4, 6 pieces at 6’6″ (1981 mm) for 8′ wall height with top and bottom plates.
- Top and bottom plates: 2×4, 2 pieces at 6′ (1829 mm) and 2 pieces at 3′ (914 mm).
- Door: 1×6 cedar boards, assembled or 2×4 framing with sheathing at 2’4″ x 6’8″ (711 x 2032 mm).
- Roof rafters: 2×4, 3 pieces at 4′ (1219 mm) for gable spanning 3′ (adjust to roof pitch).
- Roof sheathing: 1/2″ CDX plywood cut to roof dimensions (approx. 8 sq ft / 0.74 sq m).
- Fastener sizes: #8 x 1-1/2″ deck screws for cladding, #10 x 3″ exterior screws for framing connections, 1-1/4″ finish screws for trim.
- Pilot holes: Pre-drill 3/32″ pilot holes for #8 screws in hardwoods; 1/8″ for #10 screws in dimensional lumber.
- Grain direction: For floorboards, run boards perpendicular to joists; orient trim and cladding grain vertically for water shedding.
These cut lengths are for a compact 3′ x 6′ model; scale lengths proportionally for larger designs. Label each piece with masking tape and a permanent marker after cutting.
Safety and Prep for 29 Handy Outdoor Bathroom Designs for a Backyard Transformation
Personal protective equipment and a tidy workspace save time and reduce accidents. Always wear eye and hearing protection when cutting and drilling, and use a rated respirator when sanding treated lumber or applying finishes. Gloves and sturdy footwear prevent splinters and toe injuries; avoid loose clothing around power tools. Set up an organized staging area with offcuts separated and fasteners in labeled containers so you can move efficiently between steps.
Workspace considerations include level ground for the build area and good lighting. If building directly on soft ground, prepare a compacted gravel pad with weed fabric to prevent settling. Mark lines and layout points carefully using a tape measure and square; confirm squareness by measuring diagonals before fastening. Clamp workpieces during drilling to prevent binding and to ensure pilot holes stay accurate. If working in hot or cold weather, plan for finish curing times and ventilation; solvent-based products need more ventilation than water-based finishes.
How to Build 29 Handy Outdoor Bathroom Designs for a Backyard Transformation – Step-by-Step Directions
Step 1 – Prep and Layout
Clear the site and mark the footprint of the bathroom using stakes and string. Confirm local code setbacks and underground utilities before digging or anchoring; call your utility locating service if in doubt. For a 3′ x 6′ build, square the layout by measuring diagonals and adjust until the diagonals match within 1/8″.
Step 2 – Cut and Label Pieces
Cut the floor joists, rim joists, wall studs, plates, and sheathing to the cut list sizes. Label each piece with a code (FJ1, FJ2, S1, etc.) and lay them out on sawhorses in build order. Take time to check each cut for square ends and trim any high spots to ensure tight joints.
Step 3 – Dry Fit and Mark Joinery
Assemble the floor frame dry on sawhorses and place the subfloor plywood on top to check for fit. Mark locations for joist hangers and pilot holes using a square and tape measure. Pre-drill pilot holes where large screws will be used to prevent wood splitting, especially near ends of boards.
Step 4 – Assemble the Frame/Body
Secure the floor joists and rim joists using joist hangers and #10 x 3″ galvanized screws. Fasten the subfloor to the joists with 3/4″ countersunk screws every 6″ at edges and 8″ in the field; apply construction adhesive between joists and subfloor for rigidity. Erect wall frames and attach them to the subfloor using 3″ screws through the bottom plates into the subfloor and joists below.
Step 5 – Reinforce and Square
With walls standing, check diagonals for square and adjust as needed; a difference under 1/8″ indicates a square assembly. Add blocking between studs at mid-height to stiffen the walls and prevent racking. Install hurricane ties at wall-to-floor and wall-to-roof connections if in a high-wind area.
Step 6 – Attach Surfaces or Panels
Apply exterior-grade plywood sheathing to walls with 8d ring-shank nails or screws at 6″ OC around edges and 12″ OC in the field. Install the cedar or composite cladding over a vented rainscreen gap if possible (1/4″–3/8″) to allow airflow and drying behind the boards. For flooring, lay composite or cedar decking perpendicular to joists leaving the recommended expansion gap; fasten with stainless screws.
Step 7 – Sanding and Edge Treatment
Sand exterior trim and exposed edges with an orbital sander, starting with 80 grit then moving to 120 and finishing with 220 for a smooth surface. Round sharp edges slightly on door frames and thresholds to prevent splinters. Wipe surfaces with a tack cloth and remove dust from all cavities before finishing.
Step 8 – Finish Application
Apply a quality exterior sealer, stain, or paint compatible with your chosen material; for cedar, a penetrating oil or semi-transparent stain enhances grain and weather resistance. Apply two coats of finish, allowing the first coat to dry according to manufacturer instructions (typically 4–24 hours) and sanding lightly between coats if recommended. Seal joints and fastener heads with exterior caulk to prevent water ingress. If installing a composting or cassette toilet, follow manufacturer instructions for secure mounting and ventilation routing.
Maintenance Tips for 29 Handy Outdoor Bathroom Designs for a Backyard Transformation
Regular upkeep keeps an outdoor bathroom functional and attractive. Inspect sealants and caulk annually and re-caulk as needed to prevent moisture intrusion. Reapply exterior finishes every 2–4 years depending on exposure and product performance; cedar may silver naturally if untreated, which some homeowners prefer for a rustic look. Clean drains and gravel beds seasonally, especially after heavy storms, to ensure proper runoff and avoid standing water.
Winterizing a seasonal outdoor bathroom is straightforward: shut off and drain water lines, remove hoses and portable tanks, and store sensitive fixtures indoors. For year-round units in cold climates, insulate the building and consider heat trace cables on exposed plumbing to prevent freezing. Keep vent louvers clear of debris and trim vegetation that encroaches on the structure to maintain airflow and reduce pest entry.
Design Variations and Customization for 29 Handy Outdoor Bathroom Designs for a Backyard Transformation
Small footprint options: Convert a 3′ x 3′ space into a changing stall with bench seating and hooks. Use a sliding barn door to save swing space and add a mirror with a weatherproof frame. If privacy is the main concern, simple screens combined with planters can create a quiet alcove without a full structure.
Shower-forward designs: For an outdoor shower, consider a prefabricated pan or a poured concrete base with integrated linear drain. Use tile or stone pavers with a slight slope toward the drain and a deadman-type footing for the shower head if you prefer a rustic look. Add a partial roof and an overhanging eave to keep the shower usable in light rain.
Luxury bathhouses: For a more upscale addition, design a 6′ x 8′ bathhouse with a small vanity, composting toilet, and a bench with storage. Incorporate skylights or translucent panels in the roof for natural light. Plan for power runs if you want lighting, a fan, or heated floors — consult a licensed electrician for permanent electrical work.
Frequently Asked Questions about 29 Handy Outdoor Bathroom Designs for a Backyard Transformation
Q: Do I need a building permit for an outdoor bathroom?
A: Permit requirements vary by municipality; small, non-plumbed structures under a certain size may be exempt, but any permanent plumbing, sewage connections, or electrical work usually require permits and inspections.
Q: What is the best flooring material for outdoors?
A: Composite decking, cement tile, or exterior-grade stone are durable choices. Cedar decking works well for a warmer, natural feel but requires maintenance and slip-resistant treatment when wet.
Q: How do I handle drainage for an outdoor shower?
A: Use a sloped base directing water to a properly sized drain connected to a dry well or storm line per local regulations. For eco-friendlier options, route graywater to a subsurface soil infiltration bed if codes allow.
Q: Can I install a regular toilet outdoors?
A: A standard toilet requires a proper waste line and venting; off-grid composting toilets or RV-style cassette toilets are practical alternatives that avoid major plumbing work.
Q: How do I ensure privacy without building a full structure?
A: Combine lattice panels, tall planters, and evergreen plantings with movable screens to create privacy quickly and affordably.
Q: What finishes resist mildew and mold in a moist environment?
A: Use marine-grade paints or stains and ensure good ventilation. Choosing rot-resistant woods like cedar or pressure-treated lumber reduces mold risk, but keep surfaces clean and painted/sealed.
Conclusion
This comprehensive guide to 29 Handy Outdoor Bathroom Designs for a Backyard Transformation gives you the planning tools, material lists, construction steps, and maintenance tips to build an outdoor bathroom that fits your yard and lifestyle. Whether you choose a budget-friendly changing stall, a practical composting-toilet shed, or a fully plumbed bathhouse, thoughtful materials, solid framing, and proper drainage will ensure longevity and enjoyment. For design inspiration that pairs landscaping with backyard structures, check this feature on Once a Cluttered Closet, Now a Creative Workspace