
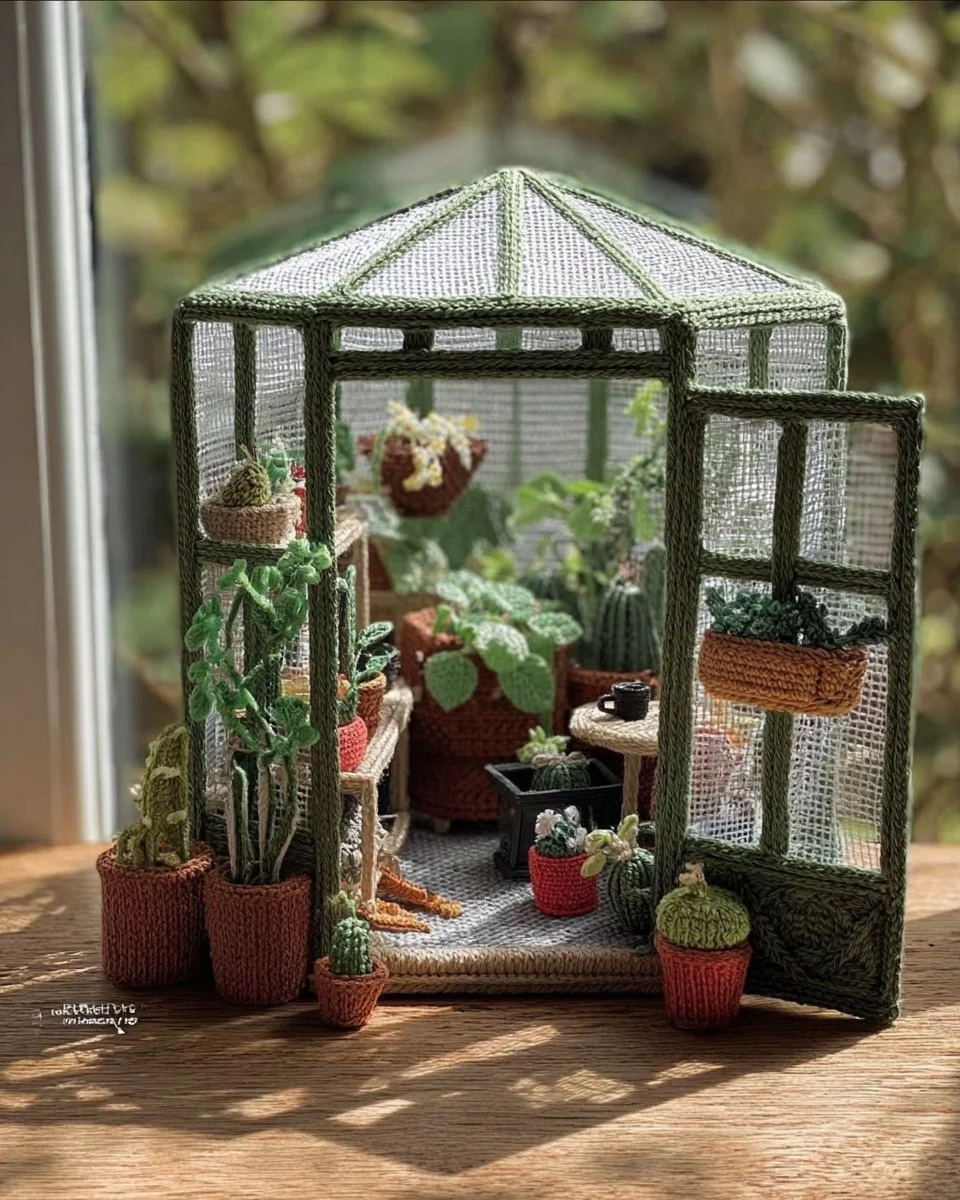
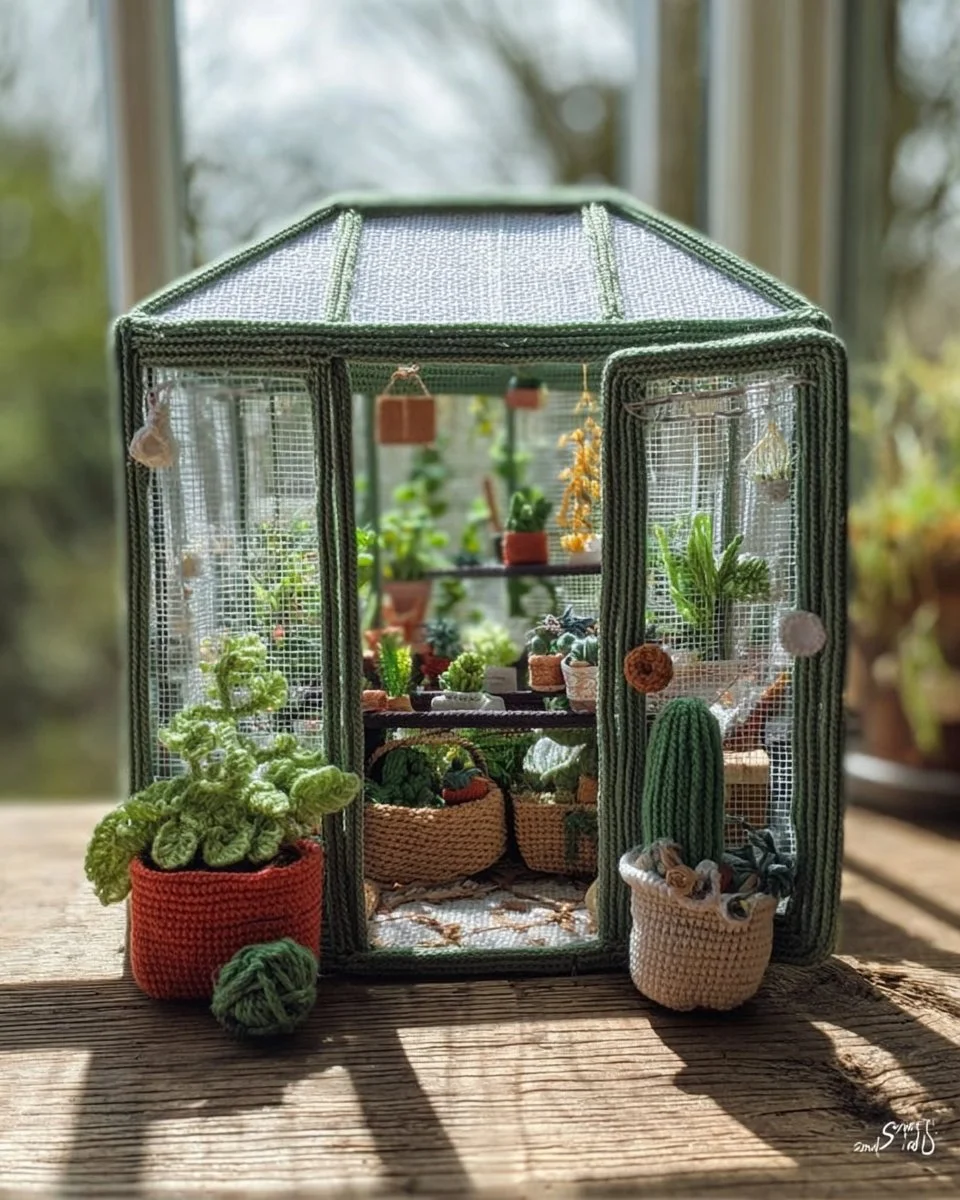
Introduction to Home – The “Gardener’s” Greenhouse
Are you a passionate gardener looking for a way to protect your plants while adding a creative touch to your gardening area? If so, you might want to explore the possibilities of creating your very own Home – The “Gardener’s” Greenhouse – Crochet | Facebook. This project is not just practical; it adds an artistic flair that can transform your gardening experience. Imagine a little haven where your plants can thrive, sheltered from the harsh weather while showcasing your crochet skills!
Building a greenhouse offers several advantages that can’t be overlooked. It’s not only an affordable solution compared to commercially bought greenhouses, but it’s also adaptable and customizable to your liking. Whether you’re looking to get this done over a weekend or are planning a more extensive project that unfolds over a few weeks, this is the perfect blend of creativity and functionality. The estimated costs are budget-friendly, making it accessible to almost everyone, regardless of their skill level.
In this article, we will cover everything you need to know about constructing a crochet greenhouse. From essential materials and tools to step-by-step instructions, you will find all the information to kickstart your crafting journey. This build is perfect for both indoor and outdoor plant lovers. By the end, you’ll be eager to start this project, knowing that your hard work will yield fruitful results for your cherished plants.
Table of Contents
Key Benefits of Home – The “Gardener’s” Greenhouse
- Durability: Made from weather-resistant materials that ensure longevity.
- Simplicity: Easy to follow instructions suitable for all skill levels.
- Versatility: Works for various plant types and sizes, from flowers to vegetables.
- Portability: Lightweight structure allows easy relocation in your garden.
- Cost Savings: DIY construction significantly reduces expenses compared to store-bought options.
- Space Efficiency: Ideal for small gardens or balconies, maximizing your gardening potential.
What Makes It Stand Out
This project stands out because it beautifully merges functionality with artistic expression. Unlike traditional greenhouses, a crocheted structure allows for unique designs that can match your taste and garden aesthetics. The customization options are nearly limitless; you can experiment with different crochet patterns and colors, creating a one-of-a-kind garden feature.
Another significant advantage is the ability to personalize the dimensions to suit your specific space. This adaptability makes it a favorite among those who may be working with limited square footage. Furthermore, crochet greenhouses are generally more lightweight than their plastic or glass counterparts, making them easier to install and adjust according to your garden’s needs.
Project Specs for Home – The “Gardener’s” Greenhouse
At-a-Glance Details
- Skill Level: Beginner to Intermediate
- Estimated Time: 10 hours
- Estimated Cost: $50 – $100 USD
- Dimensions: Heights ranging from 2-6 feet (0.6-1.8 meters), width and length can vary based on your design
- Indoor/Outdoor Suitability: Primarily outdoor
- Tools Needed at a Minimum: Crochet hook, scissors, measuring tape
Materials and Tools for Home – The “Gardener’s” Greenhouse
Complete Materials List with Measurements
- Yarn: Approximately 10 skeins of durability-focused outdoor yarn (2s for structure, 1s for embellishments).
- Piping or PVC Frame: 10-foot (3 meters) lengths, at least 2-3 total, depending on desired size.
- Plant Pots: Various sizes to fit your plant selections.
- Weighted Anchors: 3-5 for securing the structure during wind.
- Additional Embellishments: Optional, such as beads or ribbons for decorative touches.
Complete Tools List
- Crochet Hook: Size appropriate for your yarn, typically size 10-15 mm.
- Scissors: Sharp for cutting yarn cleanly.
- Measuring Tape: For accurate measurements and dimensions.
- Stitch Markers: To keep track of your progress in intricate patterns.
- Yarn Needle: For weaving in ends and securing seams.
Substitutes and Alternatives
If you’re on a budget or if specific materials are hard to find, you can look for alternatives without sacrificing quality. For instance, if outdoor yarn is not available, consider standard yarn with an added waterproof coating. PVC piping can be replaced with wooden dowels for more strength, especially in less windy areas. Always check local craft stores for deals or sales that can help you get your materials at a lower cost!
Cut List and Measurements for Home – The “Gardener’s” Greenhouse
- PVC Pipes: Cut into:
- 4 pieces of 6 feet (1.8 meters) for vertical supports.
- 4 pieces of 4 feet (1.2 meters) for horizontal supports.
- Yarn Length: Approximately 50 feet (15 meters) for crochet covering, adjust based on design.
- Ensure you check for any necessary pilot holes if adding hooks or additional decorations to the structure.
Safety and Prep for Home – The “Gardener’s” Greenhouse
Creating your crochet greenhouse should always start with safety in mind. Wearing protective gloves while handling your yarn can prevent any cuts or scratches from sharp fibers. Preparing your workspace is also crucial. Ensure you have enough room to spread out your materials without cluttering your area, and keep all your tools organized.
When measuring and cutting materials, accuracy is vital. Double-check your dimensions before making cuts, and label your pieces to avoid confusion later on. Besides, proper ventilation is essential if you’re working with specific yarn materials that may produce odors.
How to Build Home – The “Gardener’s” Greenhouse Step-by-Step Directions
Step 1 – Prep and Layout
Start by planning your greenhouse design. Take measurements of the space where you want to place it, and mark the ground where the frame will go. A simple sketch can help visualize the structure and proportions. Ensure your location receives adequate sunlight for your plants.
Step 2 – Cut and Label Pieces
Using your measured dimensions, cut the PVC pipes accordingly. Label each piece based on its location in your design. Doing this will make assembly straightforward and prevent any mix-ups.
Step 3 – Dry Fit and Mark Joinery
Before assembling, do a dry fit to see how your pieces come together. Mark any spots where joints may need extra support. Ensure everything lines up properly, and make adjustments as necessary before securing the frame.
Step 4 – Assemble the Frame/Body
Begin assembling the frame by connecting the vertical and horizontal pieces of piping using connectors. Tighten connections to ensure stability; there’s no need to over torque it, just enough to keep everything secure.
Step 5 – Reinforce and Square
Check that your frame is square by measuring diagonals from corner to corner. Adjust as needed to eliminate any wobble. Reinforce joints with additional connectors or clamps if necessary for increased stability.
Step 6 – Attach Surfaces or Panels
Now, it’s time to start crocheting your covering. Attach your first yarn anchor to the frame and begin crocheting in your chosen design. Plan for ample space between crochet stitches to allow light to filter through while still providing shade.
Step 7 – Sanding and Edge Treatment
If you’re using any wooden components, sand down edges to avoid splinters or rough areas. Clean any debris or dust, especially if you plan to stain or seal materials to enhance longevity.
Step 8 – Finish Application
Once the structure is complete and secured, apply finishing touches. If desired, seal any wood with a weather-resistant varnish or paint. Allow adequate drying time as per the manufacturer’s instructions before introducing any plants.
FAQ Section for Home – The “Gardener’s” Greenhouse
What if I have limited space?
You can customize the dimensions of your greenhouse to fit any available area. Just be sure to adjust your materials accordingly.
Is this project suitable for beginners?
Absolutely! The project offers simple instructions that make it accessible for all skill levels.
How do I ensure my greenhouse is stable in windy conditions?
Adding weighted anchors can significantly help stabilize your greenhouse. Ensure your frame is securely anchored to the ground as well.
Can I use indoor plants in the greenhouse?
While primarily designed for outdoor use, you can certainly adapt the greenhouse for indoor plants by modifying ventilation methods.
What kind of yarn should I use for durability?
Opt for outdoor yarns designed to withstand weather conditions; look for materials labeled as UV-treated or water-resistant.