
Introduction to Easy DIY Pebble Pot Tutorial
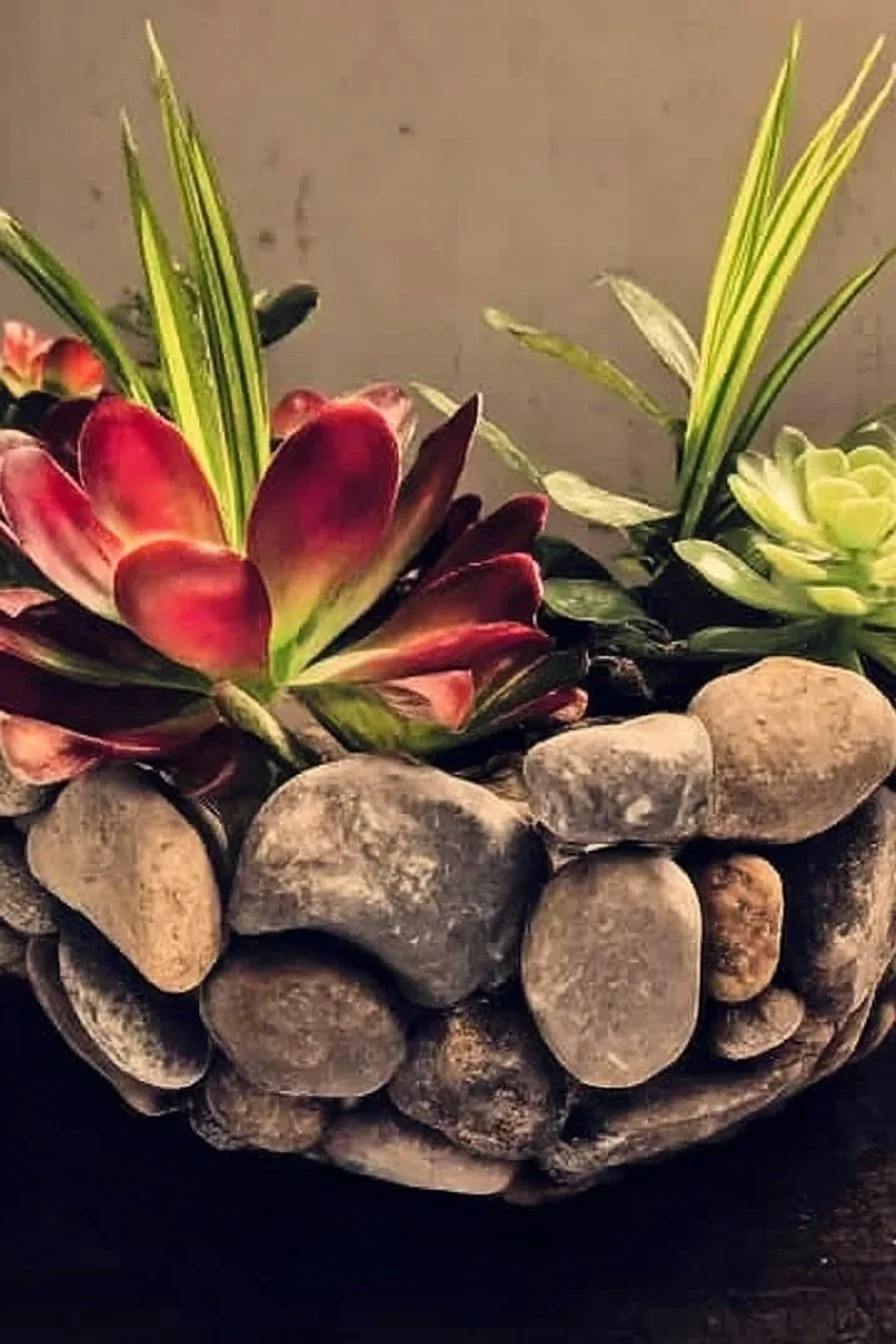
Are you looking for a charming way to enhance your indoor or outdoor space? The Easy DIY Pebble Pot Tutorial is just what you need. This delightful project combines creativity and practicality, allowing you to craft a stunning pot that will add a unique touch to your garden or living room.
Imagine the earthy beauty of pebbles artfully arranged to form a pot that not only looks good but also holds your favorite plants. It’s an irresistible way to express your creativity while being budget-friendly. In just a few hours, with minimal materials and tools, you can create something truly special.
This project is both beginner-friendly and rewarding, making it a perfect choice for a weekend activity. The cost is low, and you can customize the design to fit your personal style. Whether you place it indoors or outdoors, this pebble pot can be an eye-catching centerpiece.
Key Benefits of Easy DIY Pebble Pot Tutorial
Why You’ll Love This Build
- Durable: Made from natural stones that withstand various weather conditions.
- Simple: Requires minimal tools and straightforward steps, perfect for beginners.
- Versatile: You can customize the size and design to fit any space.
- Portable: Lightweight enough to move around without hassle.
- Cost-effective: Utilizes inexpensive materials found at craft stores or outdoors.
- Low maintenance: Once made, it requires minimal upkeep.
What Makes It Stand Out
This DIY project stands out due to its originality. The mix of pebbles creates a natural aesthetic that is often hard to find in store-bought pots. You can easily personalize your pebble pot with different colors and sizes of stones, ensuring that no two pots will ever be alike.
Additionally, while many planters are made from plastic or ceramics, using pebbles gives a more organic feel that complements many types of decor. Whether you’re decorating a cozy corner or a garden, the pebble pot is adaptable to your needs and style preferences.
Project Specs for Easy DIY Pebble Pot Tutorial
At-a-Glance Details
- Skill Level: Beginner
- Estimated Time: 3-4 hours
- Estimated Cost: $15-25
- Dimensions: Varies based on design (typically 10-12 inches diameter, 12-15 inches height)
- Indoor/Outdoor Suitability: Suitable for both
- Tools Needed at a Minimum: Hot glue gun, scissors, bucket for mixing adhesive
Materials and Tools for Easy DIY Pebble Pot Tutorial
Complete Materials List with Measurements
- Smooth River Pebbles: Approximately 2-3 pounds (0.9-1.4 kg)
- Floral Foam: 1 block for a planter base
- Outdoor Adhesive: 1 bottle (about 8 oz/236 ml)
- Paint or Sealant: Optional, for finishing touches
Complete Tools List
- Hot Glue Gun: Essential for adhering stones
- Scissors: For cutting the floral foam to size
- Bucket: For mixing adhesive if required
- Measuring Tape: To ensure accurate dimensions
Substitutes and Alternatives
If you don’t have river pebbles on hand, consider using other stones like crushed granite or decorative gravel. For the adhesive, any strong outdoor glue will work if you don’t have the specific type listed. Additionally, you could paint or stain the final pot to better match your surroundings, allowing for even more customization based on your preferences or seasonal themes.
Cut List and Measurements for Easy DIY Pebble Pot Tutorial
- Floral Foam: Cut into a circle, approximately 10-12 inches (25-30 cm) in diameter for the base.
- River Pebbles: Use various sizes (1-3 inches or 2.5-7.5 cm) for visual interest.
- Adhesive Layer: No cutting necessary; simply apply per manufacturer’s instructions.
Safety and Prep for Easy DIY Pebble Pot Tutorial
Before starting your project, it’s vital to set up a clean, well-lit workspace. Ensure you’re comfortable and equipped with safety goggles to protect your eyes, especially if working with any sharp objects. Have all your materials and tools ready to minimize disruption during your build.
Proper measuring and marking are essential. Take your time to double-check measurements for accuracy. Clamping the floral foam while applying the stones can help ensure everything holds together properly as you work. Remember to work in a well-ventilated area, especially when using adhesives.
How to Build Easy DIY Pebble Pot Tutorial – Step-by-Step Directions
Step 1 – Prep and Layout
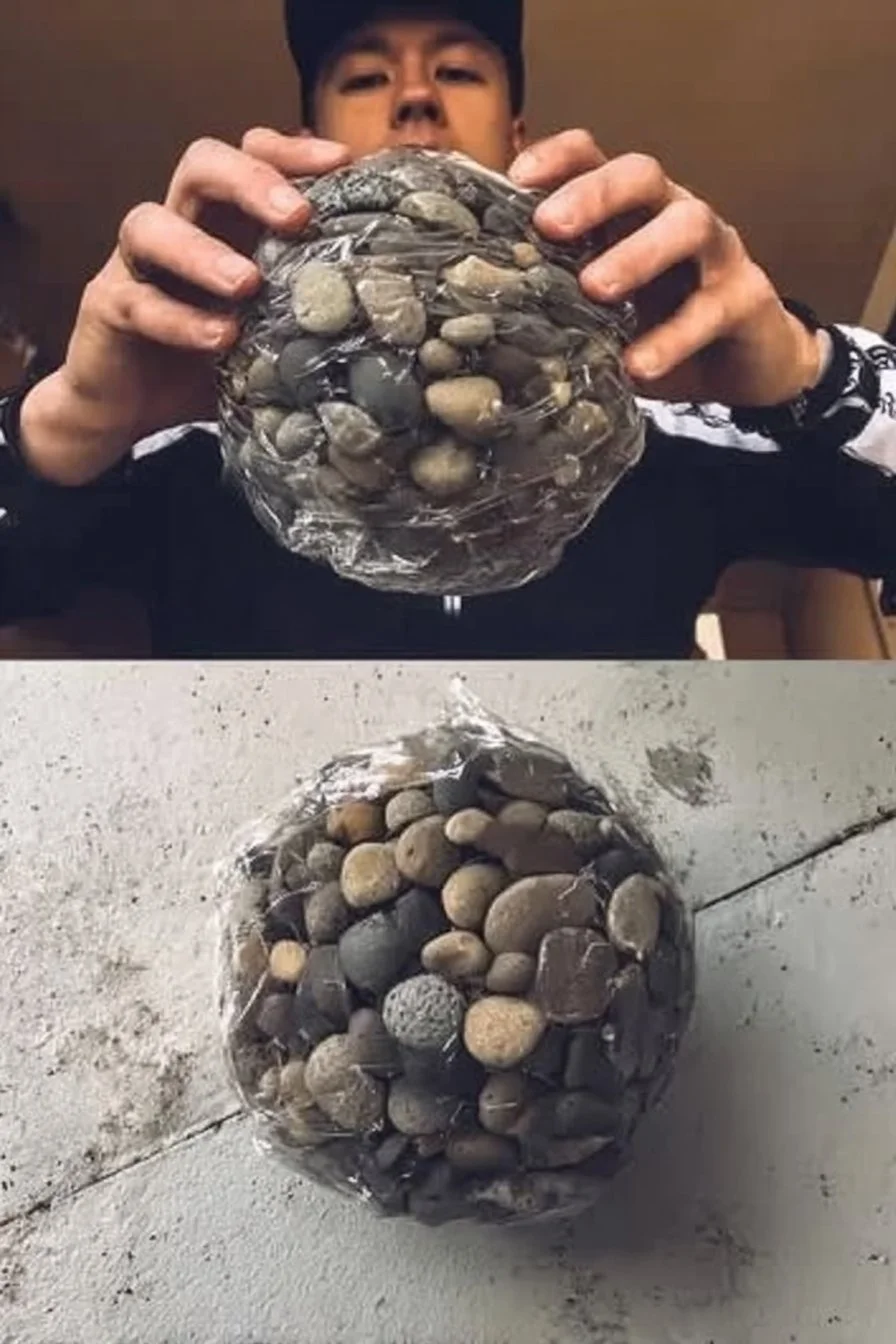
Begin by gathering all your materials and tools. Choose a flat work surface and lay out your floral foam. Measure and cut it into an appropriate size that will serve as your base for the pot. Use a measuring tape for accuracy.
Step 2 – Cut and Label Pieces
Using scissors, cut the floral foam into a disc shape measuring around 10-12 inches (25-30 cm) in diameter. Label each piece of foam if you decide to create different layers for added height.
Step 3 – Dry Fit and Mark Joinery
Before applying any adhesive, dry fit the pebbles around the floral foam base. This will help you visualize where each stone will go. Mark areas for layers or clusters with a pen or pencil.
Step 4 – Assemble the Frame/Body
Using the hot glue gun, begin adhering the pebbles to the floral foam. Start from the bottom and work your way up for stability. Apply a generous amount of glue to each stone and hold it in place for a few seconds to ensure it sticks.
Step 5 – Reinforce and Square
As you build, check that your structure feels stable. Look for any wobbly sections and reinforce them with additional stones or more glue.
Step 6 – Attach Surfaces or Panels
Once the entire base layer is covered in stones, carefully add more pebbles on top if you wish to build upward. Ensure you space the stones evenly, applying glue in between where necessary.
Step 7 – Sanding and Edge Treatment
While your pot is drying, you might want to sand the edges of the floral foam if they are too sharp. This step is optional but may help enhance the final appearance.
Step 8 – Finish Application
To protect your pebble pot, consider applying a coat of outdoor sealant once the glue has dried completely. This will help maintain its integrity and appearance over time, especially if placed outdoors.
FAQ about Easy DIY Pebble Pot Tutorial
What types of stones can I use for this project?
You can use smooth river stones, decorative gravel, or even seashells for a unique look.
How long will it take to dry?
Allow the hot glue to dry for at least 2-3 hours before moving the pot.
Can I plant directly in this pot?
It’s best to use a plastic liner inside the pebble pot to retain water and protect the foam base.
Is this project suitable for kids?
Yes, but adult supervision is recommended when using hot glue.
What kind of plants can I use?
Small plants like succulents, herbs, or flowers work best to keep the design balanced.
How can I customize the design?
You can paint the stones, use different pebble colors, or add decoration such as ribbons or lace around the pot.