

Introduction to Bloomin Onion
Bloomin Onion is a show-stopping appetizer that turns a humble onion into a crispy, flavorful centerpiece for any meal. Have you ever wondered how a simple vegetable becomes a dramatic, crunchy flower of fried goodness? This Bloomin Onion recipe answers that curiosity with step-by-step instructions, tips, and tricks to get restaurant-quality results at home. (1)
The texture contrast of a crisp, well-battered exterior and a tender, sweet interior is what makes this Bloomin Onion irresistible. Whether you’re feeding a family, hosting a party, or craving a nostalgic classic, this Bloomin Onion brings the sensory experience of dining out right to your kitchen. (2)
This Bloomin Onion guide covers everything from ingredients and substitutions to troubleshooting common mistakes. You’ll learn how to slice the onion to create the “petals,” which batter binds best, and how to achieve an even golden fry without sogginess. The result is a perfectly blooming, crunchy appetizer every time. (3)
If you prefer a lighter alternative or want to experiment with equipment, consider checking a tested air fryer option like this air fryer blooming onion recipe for a crispy version with less oil. This single resource complements the traditional deep-fry method explained here and offers inspiration for healthier cooking. (4)
Throughout this article you’ll find practical tips for prepping, seasoning, and serving your Bloomin Onion. You’ll also discover why this Bloomin Onion has become a beloved indulgence: it’s shareable, customizable, and endlessly satisfying. Ready to learn how to make this iconic appetizer at home? Read on for detailed steps, storage advice, variations, and answers to frequently asked questions that will turn you into the go-to Bloomin Onion expert. (5)
Table of Contents
Key Benefits of Bloomin Onion
Why You’ll Love This Recipe
- Irresistible texture: crisp outside, tender inside creates a crave-worthy bite.
- Crowd-pleaser: perfect for parties, game days, and family dinners.
- Customizable: spices and dipping sauces can be tailored to your taste.
- Visual impact: turns a simple onion into a memorable centerpiece.
- Make-ahead friendly: batter and sauce can be prepared ahead for stress-free frying.
- Versatile cooking methods: deep-fry, air-fry, or bake depending on preference.
What Makes It Stand Out
The magic of this Bloomin Onion lies in its transformation from an ordinary vegetable to an extraordinary appetizer. The cut technique that forms the petals and the seasoned batter that clings to every crevice are the hallmarks of a great Bloomin Onion. The combination of visual appeal and textural contrast sets it apart from other starters. The Bloom is also endlessly adaptable: swap spices, try different dipping sauces, or scale the recipe to fit an intimate meal or a party spread. (6)
Ingredients for Bloomin Onion
Complete Ingredient List with Measurements
- 1 very large sweet onion (about 2 pounds), peeled and trimmed.
- 2 cups all-purpose flour for coating.
- 1 cup cornstarch (optional for extra crispiness).
- 2 teaspoons salt.
- 1 teaspoon black pepper.
- 1 teaspoon paprika.
- 1 teaspoon garlic powder.
- 1/2 teaspoon cayenne pepper (adjust for heat).
- 2 large eggs.
- 1 cup whole milk or buttermilk for richer flavor.
- 1 teaspoon baking powder (for lightness).
- Vegetable oil for deep frying (enough to submerge the onion).
- Optional: 1 cup panko breadcrumbs for extra crunch.
- For dipping sauce: 1/2 cup mayonnaise, 2 tablespoons ketchup, 1 tablespoon horseradish, 1/2 teaspoon smoked paprika, salt and pepper to taste.
Substitutes and Alternatives
If you need a gluten-free Bloomin Onion, swap the all-purpose flour and cornstarch with a 1:1 gluten-free flour blend and use gluten-free panko or skip breadcrumbs. For a dairy-free version, replace milk or buttermilk with unsweetened plant milk like almond or oat milk and use a dairy-free mayonnaise for the dipping sauce. To reduce the oil load without sacrificing crunch, try a hybrid approach by using a light batter and finishing in a hot oven after a quick shallow fry, or use an air fryer as referenced earlier. (7)
How to Make Bloomin Onion – Step-by-Step Directions
Step 1 – Prepare Ingredients
Choose a firm, large sweet onion that’s wide enough to create many petals. Peel the outer layer and cut off the top (stem end) so the onion sits flat. Keep the root intact to hold petals together during cutting and frying. (8)
Step 2 – Slice the Onion into Petals
Place the onion cut-side down and slice vertically from the top toward the root. Make 12–16 cuts evenly spaced, stopping before you cut through the root. Gently separate and fan the petals to ensure they’ll open like a flower during cooking. Work carefully to avoid cutting through the base. (9)
Step 3 – Make the Batter
In a bowl whisk together eggs and milk until blended. In a separate bowl combine flour, cornstarch, baking powder, salt, pepper, paprika, garlic powder, and cayenne. Dredge the onion in the dry mix to coat the petals, then apply the wet mixture and return to the dry mixture for a double coating. For extra crunch, press panko breadcrumbs lightly onto the petals. (10)
Step 4 – Heat the Oil
Fill a deep, heavy pot with enough vegetable oil to submerge the onion and heat to 350°F (175°C). Use a thermometer for accuracy; oil that’s too cool will produce a greasy Bloomin Onion and oil that’s too hot will burn the coating before the center cooks. Maintain consistent temperature by frying one onion at a time. (11)
Step 5 – Fry the Onion
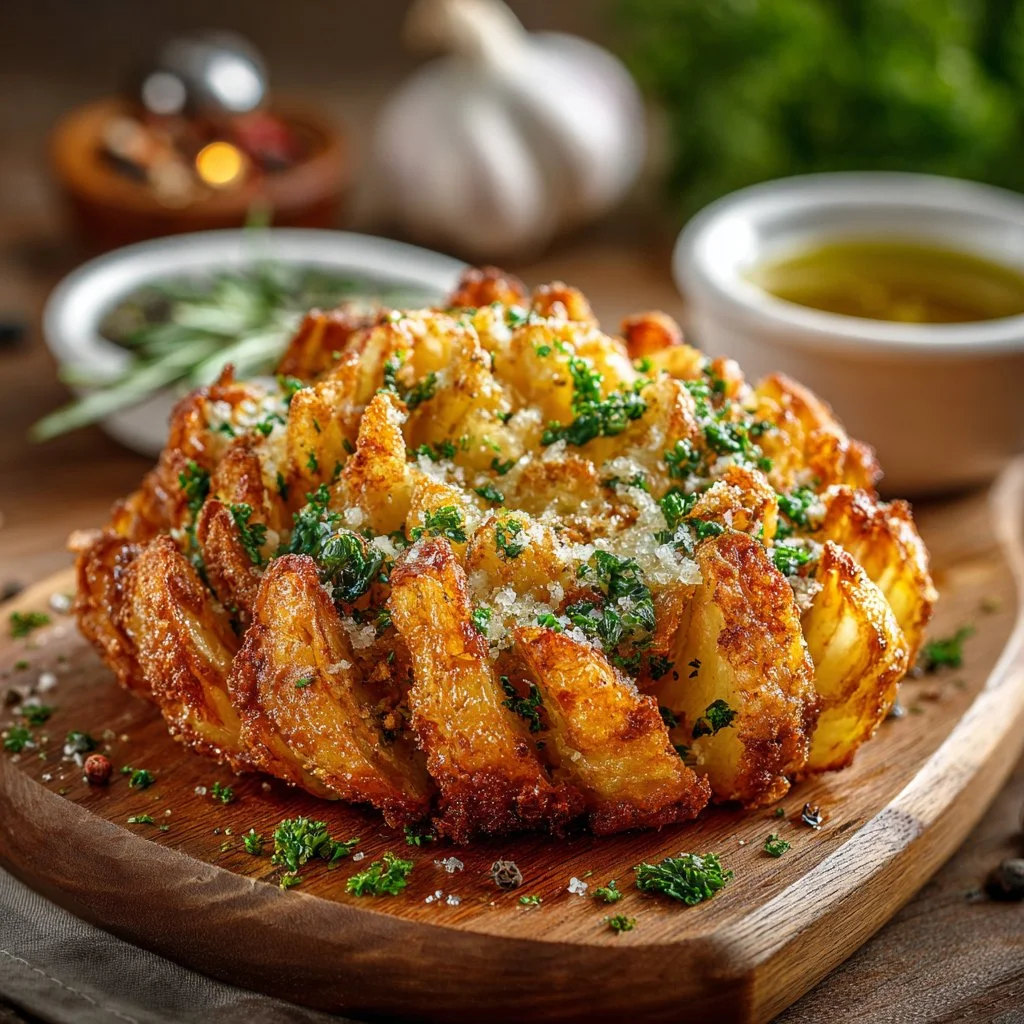
Carefully lower the coated onion into the hot oil, root-side up so the petals splay downward and cook evenly. Fry for 3–5 minutes per side, turning gently if necessary, until golden brown and crisp. The exterior should be deep golden and the onion interior tender when pierced with a fork. (12)
Step 6 – Drain and Season
Lift the Bloomin Onion from the oil and drain on a wire rack or paper towels briefly to remove excess oil. While still warm, sprinkle with a pinch of extra salt or smoked paprika for a finishing touch. Allow it to rest for a minute so the petals set and the interior finishes cooking. (13)
Step 7 – Make the Dipping Sauce
Combine mayonnaise, ketchup, horseradish, smoked paprika, and a pinch of salt and pepper in a small bowl. Adjust the heat with more horseradish or cayenne if you like it spicy. Chill for at least 10 minutes to let flavors meld; serve alongside the Bloomin Onion. (14)
Step 8 – Present and Serve
Place the Bloomin Onion on a shallow serving dish with the dipping sauce in a bowl in the center or beside it. Encourage guests to pull off a petal and dip. For parties, consider providing small plates and napkins—this Bloomin Onion is meant to be a fun, shareable experience. (15)
Step 9 – Reheat Tips if Needed
If you need to re-crisp a previously cooked Bloomin Onion, place it in a preheated oven at 375°F (190°C) on a wire rack for 8–10 minutes. Avoid microwaving, which makes the batter soggy. Use a light spray of oil to refresh crispness while reheating. (16)
Step 10 – Clean-Up and Leftovers
After enjoying your Bloomin Onion, strain and cool the frying oil if you plan to reuse it for future frying. Store cooled leftovers in an airtight container for up to 2 days in the refrigerator; crisp up in the oven before serving. Leftover petals work well chopped over salads for a crunchy garnish. (17)
Serving Suggestions for Bloomin Onion
Best Occasions to Serve This Dish
Bloomin Onion is ideal for game day gatherings, backyard barbecues, and casual dinner parties where guests can snack and socialize. It also makes an impressive starter for holiday meals or potlucks where presentation matters. Pair this Bloomin Onion with a variety of small plates for a shareable feast. (18)
What to Serve With It
Serve alongside fresh vegetable crudités, a platter of dipping sauces (ranch, spicy aioli, blue cheese), or hearty mains like steaks, burgers, or grilled fish. For beverages, pair with cold beer, crisp cider, or a bright, citrusy cocktail that cuts through the richness of the fried batter. Garnish with chopped parsley or chives for color. (19)
How to Store Bloomin Onion Properly
Best Storage Practices
Cool your Bloomin Onion completely before storing to minimize condensation. Place leftovers in an airtight container lined with paper towels to absorb moisture and help maintain some crispness. Store in the refrigerator for up to 2 days; beyond that the texture degrades significantly. (20)
Reheating and Freezing Tips
For reheating, use a convection oven or air fryer at 375°F (190°C) for 8–12 minutes until the exterior regains crispness. Do not microwave. Freezing is not recommended for whole prepared Bloomin Onion because ice crystals will cause the batter to become soggy on reheating. If you must freeze, remove petals, flash-freeze them on a tray, then transfer to a freezer bag; reheat directly from frozen in an air fryer for best results. (21)
Tips & Tricks for Bloomin Onion
Mistakes to Avoid
- Cutting too deep at the base: If you slice through the root, the petals will fall apart during frying and you’ll lose the iconic bloom structure. (22)
- Overcrowding the fryer: Frying multiple onions at once drops oil temperature and results in greasy batter rather than a crisp Bloomin Onion. (23)
- Using cold batter: Batter that is too cold can separate or not adhere uniformly; bring ingredients to similar temperatures for consistency. (24)
- Skipping the double-dredge: A single coat may flake off during frying; double-coating creates a sturdier, crunchy crust that clings to each petal. (25)
- Not seasoning immediately: Seasoning right after frying allows the salt to stick to the hot batter, enhancing flavor in each bite. (26)
- Microwaving leftovers: Microwaves make the batter limp and chewy; reheating in an oven or air fryer is the best method to regain texture. (27)
Extra Tips for Better Results
For the crispiest Bloomin Onion, use a combination of flour and cornstarch in the dry mix and add a small amount of baking powder to the batter for lightness. Let the battered onion rest briefly before frying to set the coating. Maintain oil at a steady 350°F (175°C) and use a thermometer to avoid guesswork. If you want a more flavorful crust, season the flour mixture generously and consider adding a teaspoon of onion or celery salt for depth. (28)
Recipe Variations of Bloomin Onion
Creative Twists
- Spicy Cajun Bloom: Add extra cayenne, smoked paprika, and a teaspoon of Cajun seasoning to the dry mix for a bold Southern flavor profile. Serve with a lemony remoulade for brightness. (29)
- Cheesy Bloom: Sprinkle grated Parmesan or Asiago over the hot petals right after frying for a salty, cheesy finish that pairs well with garlic aioli. (30)
- Herb-Infused Bloom: Fold finely chopped fresh herbs like parsley, thyme, or chives into the batter or the breadcrumb layer for a fragrant, garden-fresh twist. (31)
- Mini Blooms for Parties: Use smaller onions and adjust frying time for bite-sized blooms that are easy to serve as finger foods at large gatherings. (32)
Dietary Adjustments
For a vegan Bloomin Onion, replace eggs and dairy with a flaxseed “egg” (1 tablespoon flaxseed meal + 3 tablespoons water per egg) and use plant milk. Use vegan mayonnaise for the dipping sauce and ensure your flour blend is vegan-friendly. For gluten-free needs, substitute with a certified gluten-free flour blend and check that breadcrumbs are gluten-free. Air frying can also reduce oil for those watching fat intake while still delivering a satisfying crunch. (33)
Conclusion about Bloomin Onion
This Bloomin Onion recipe is a celebration of texture, flavor, and spectacle that elevates a simple onion into an unforgettable appetizer. The combination of a well-executed cut, a seasoned double-coating, and precise frying technique yields a crisp, golden blossom that’s perfect for sharing with family and friends. Whether you stick with the traditional deep-fry method or experiment with baking or air-frying for a lighter version, this Bloomin Onion adapts well to different diets and occasions. Practice will improve your cutting and frying skills, and making the dipping sauce ahead of time will streamline your prep. If you want to compare a classic preparation with restaurant inspiration, see the signature version at Bloomin’ Onion – Outback Steakhouse for a reference point and presentation ideas. Try this Bloomin Onion for your next gathering and enjoy the fun of sharing a crunchy, saucy centerpiece that’s both nostalgic and delightfully indulgent. (34)
FAQ
1 – How long does a cooked Bloomin Onion keep in the fridge?
Cooked Bloomin Onion will keep for up to 2 days in the refrigerator when stored in an airtight container lined with paper towels to absorb moisture. For best texture, re-crisp in an oven or air fryer before serving.
2 – Can I make the batter and sauce ahead of time?
Yes, you can prepare the dry mix, wet batter, and dipping sauce up to a day ahead. Keep the dry and wet components separate and combine just before coating to ensure the batter adheres properly to the petals.
3 – Is it possible to bake instead of fry?
Baking is possible but requires a different technique: spray the battered petals with oil and bake on a wire rack at 425°F (220°C) until golden, turning once. Expect slightly different texture from deep-frying but still quite enjoyable.
4 – How do I prevent the petals from falling apart?
Do not cut through the root when slicing petals; leave the base intact to hold the onion together. Chill the onion for a few minutes after cutting to firm it up before battering.
5 – Can I freeze leftover petals?
You can freeze individual petals: flash-freeze them on a tray, then transfer to a freezer bag. Reheat from frozen in an air fryer for best results; whole prepared Bloomin Onion does not freeze well.
6 – What’s the best oil to use for frying?
Neutral oils with high smoke points like vegetable, canola, or peanut oil are ideal for frying a Bloomin Onion. They allow the batter to brown evenly without imparting unwanted flavors.
7 – How do I make a gluten-free Bloomin Onion?
Use a certified gluten-free flour blend and gluten-free breadcrumbs or cornstarch for crispness. Check seasonings and sauces for hidden gluten ingredients. Air frying can also help keep the coating crisp without wheat.
8 – Can I make smaller portions for kids or small gatherings?
Yes, use medium or small onions and reduce frying time accordingly. Mini Bloomin Onions are great for parties and are easier for guests to handle and dip.
9 – What dipping sauces pair best with this dish?
Classic pairings include spicy mayo, horseradish sauce, ranch, blue cheese, or a tangy remoulade. The sauce should balance the richness of the fried batter with acidity or heat.
10 – How do I ensure even cooking inside the petals?
Keep oil temperature steady at 350°F (175°C) and fry one Bloomin Onion at a time. If the oil drops too low, the outside will over-absorb oil before the center cooks; too hot and the crust will burn.