
Introduction to DIY Outdoor Fairy Garden Ideas – Easy Garden Magic
Have you ever wanted to step into a magical world right in your backyard? Creating a fairy garden is not only a charming way to beautify your outdoor space, but it also provides an enchanting escape that sparks creativity in both children and adults. The DIY Outdoor Fairy Garden Ideas – Easy Garden Magic is your gateway to making this whimsical addition possible, even with limited time and funds. Picture tiny fairies living among the vibrant flowers, intricate pathways, and delightful miniatures of your very own creation.
This project is special as it invites nature into your garden, encouraging outdoor play and imagination. And the best part? You don’t need to be a gardening expert or a crafting pro to pull it off. In fact, building a fairy garden can be done on a budget and can typically be completed in a delightful afternoon. The project is versatile enough for both indoor and outdoor setups. While the ingredients can be whimsical and varied, they can also be affordable, giving you the creative freedom to express your personal touch without breaking the bank.
Are you ready to bring a bit of magic into your life? With the right materials, tools, and a simple step-by-step guide, crafting your own fairy garden is an achievable dream. Grab your gardening gloves and get ready; you’re just moments away from creating a space that will captivate and inspire!
Table of Contents
Key Benefits of DIY Outdoor Fairy Garden Ideas – Easy Garden Magic
Why You’ll Love This Build
- Durability: Built to withstand the elements and provide long-lasting joy.
- Simplicity: Easy to follow steps make it accessible for beginners and experts alike.
- Versatility: Customize it with various themes and decorations to match your style.
- Portability: Move your fairy garden easily, making it adaptable for different locations.
- Weather Resistance: Use materials that hold up well to outdoor conditions, ensuring year-round enjoyment.
- Cost Savings: Creating your own means significant savings compared to store-bought options.
What Makes It Stand Out
Unlike store-bought items, which can often feel generic, a DIY fairy garden allows for originality and customization that’s uniquely yours. You can choose specific colors, themes, and decorations that resonate with your personal style or the interests of your loved ones. It’s perfect for events like birthdays, and holidays; no two fairy gardens will ever look the same.
Furthermore, fairy gardens can serve as an interactive experience. They can bring family members together, allowing for bonding while engaging in creative activities. Each time you step into your outdoor escape, you’ll be reminded of the wonderful memories created in its making.
Project Specs for DIY Outdoor Fairy Garden Ideas – Easy Garden Magic
At-a-Glance Details
- Skill Level: Beginner to Intermediate
- Estimated Time: 3-5 hours
- Estimated Cost: $50 – $100
- Dimensions: Size varies; typically 2-4 feet wide (61-122 cm)
- Indoor/Outdoor Suitability: Outdoor primarily, can also be adapted for indoor use
- Tools Needed at a Minimum: Gardening hand tools, glue gun, scissors, and paintbrush.
Materials and Tools for DIY Outdoor Fairy Garden Ideas – Easy Garden Magic
Complete Materials List with Measurements
- Container: Wooden crate, decorative pot, or large bowl (approximately 18-24 inches / 45-60 cm).
- Soil: Potting mix (5 quarts or more depending on container size).
- Plants: Assorted small plants, succulents, or herbs (choose 3-5 different types).
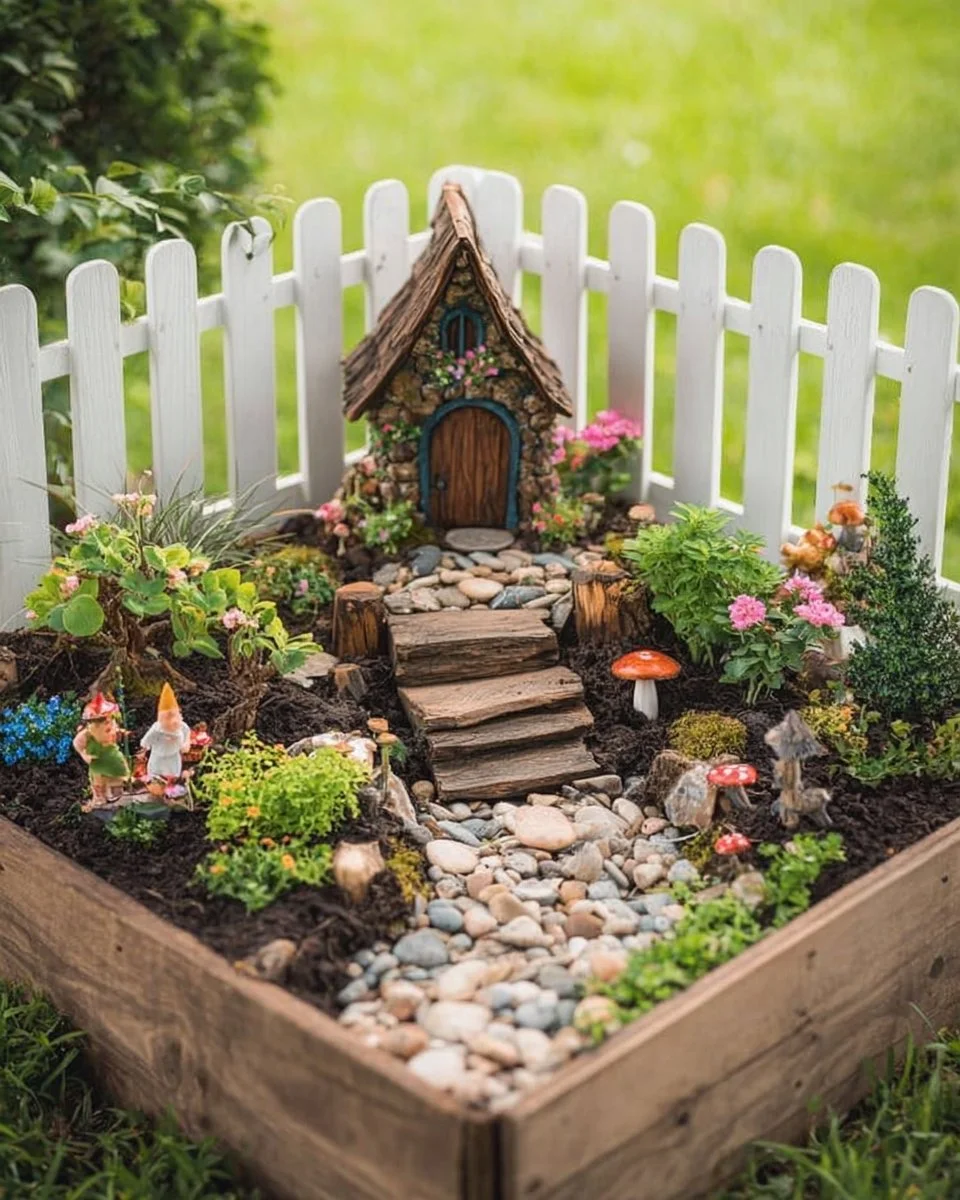
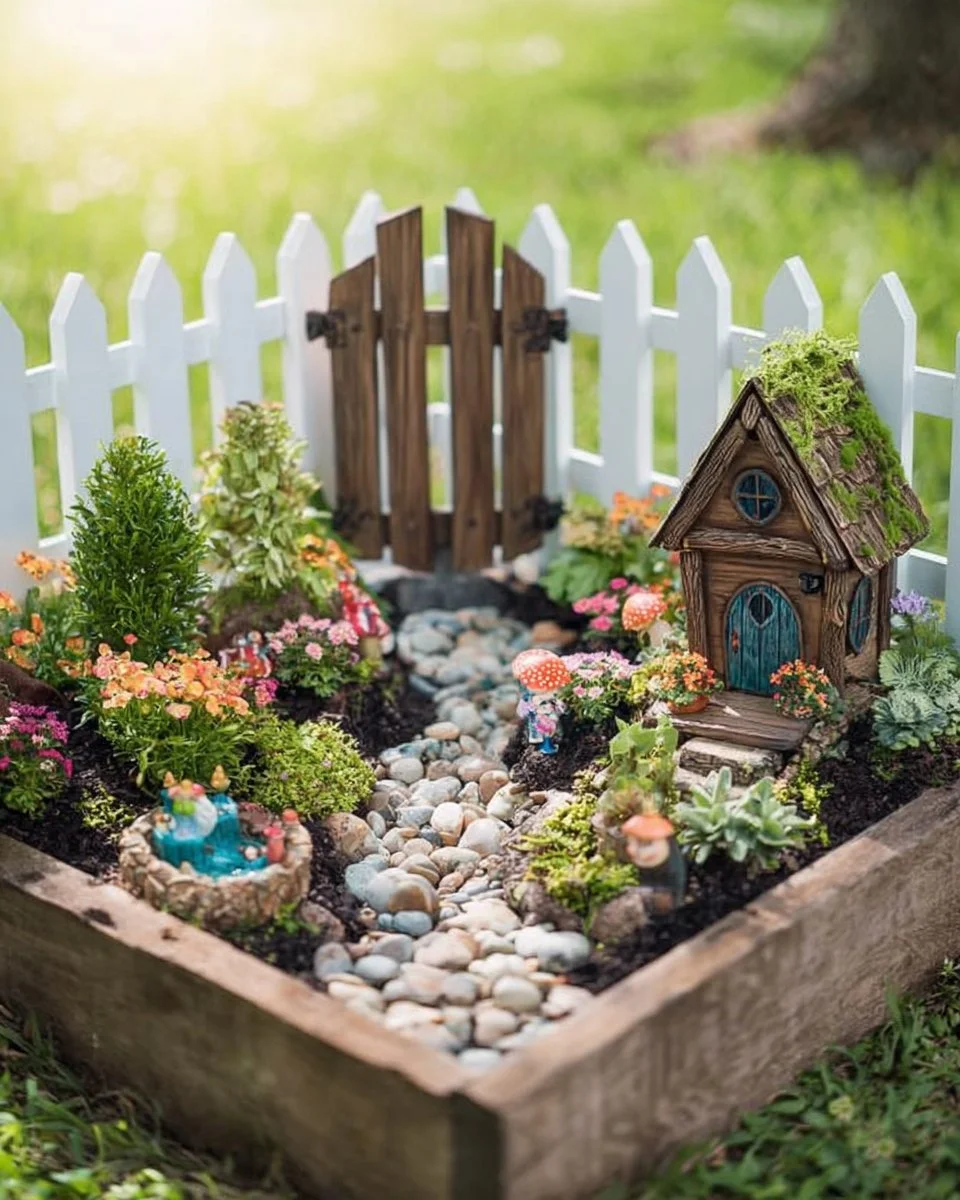
- Miniatures: Fairy figurines, tiny fences, and accessories (as desired).
- Stones: Small pebbles or gravel for pathways (1-2 bags).
- Moss: Sheet moss or reindeer moss for ground cover (1 bag).
- Wood or Craft Materials: Craft sticks, twigs, or other grains for benches or structures.
Complete Tools List
- Gardening Hand Tools: Trowel, scissors, and a watering can.
- Glue Gun: For securing decorations.
- Paintbrush: If painting miniatures or decorations.
- Ruler or Measuring Tape: For precise measurements.
- Safety Gear: Gloves and ideally, a dust mask for handling soil or paint.
Substitutes and Alternatives
When looking for materials, don’t feel limited by what’s listed. Consider using recycled items such as old containers, empty bottles, or even leftover craft supplies. For flowers, consider sourcing native plants, which are often more resilient and affordable. If you wish to create miniatures, crafts from natural items like stones or twigs can offer a rustic charm that’s both delightful and budget-friendly.
If you can’t find specific tools, look for multi-use gardening tools. Often, one tool can serve multiple functions. A simple ruler can replace specific measuring tools, ensuring you can still create accurately.
Cut List and Measurements for DIY Outdoor Fairy Garden Ideas – Easy Garden Magic
- Mini Benches or Chairs: Cut from craft sticks, 6 inches (15 cm) long each.
- Pathways: Any leftover wood scraps can be cut to 3-6 inches (7.5-15 cm) width and desired lengths.
- Fencing: Cut from twigs or craft sticks, 12 inches (30 cm) tall, based on your size requirements.
- Figurines or Decorations: Various pre-made or custom-made items; no cutting required.
Safety and Prep for DIY Outdoor Fairy Garden Ideas – Easy Garden Magic
Before starting, ensure you have all necessary Personal Protective Equipment (PPE) on hand, including gloves and possibly a dust mask if you’re spraying paint. A clean, well-lit workspace will help keep your project organized and safe.
Measure accurately, double-checking each measurement before cutting or planting. Consider clamping heavier items while glue sets, and ensure your workspace is ventilated, especially if you’re utilizing materials with strong odors.
How to Build DIY Outdoor Fairy Garden Ideas – Easy Garden Magic – Step-by-Step Directions
Step 1 – Prep and Layout
Start by choosing a sunny spot in your yard or garden. Mark out the size of your fairy garden using a garden hose or a measuring tape. Keep in mind that the area should be easily visible for enjoyment but also safe from too much foot traffic.
Step 2 – Cut and Label Pieces
If you are using wooden materials for pathways or fences, measure and cut each piece according to the cut list provided. Label each piece with a piece of tape to ensure easier assembly later.
Step 3 – Dry Fit and Mark Joinery
Before securing anything permanently, lay out all your pieces. Check the fit and spacing, ensuring each component sits well together. Use a pencil or marker to mark where parts will connect, making assembly smoother.
Step 4 – Assemble the Frame/Body
Using your glue gun, start by securing the frames of your pathways and any structures like benches or fences. Hold each piece for a few seconds until the glue sets before moving onto the next piece, ensuring it remains stable.
Step 5 – Reinforce and Square
Test for squareness by checking the diagonals of your frame. Adjust as necessary to avoid a crooked structure. Add additional glue or small nails to reinforce the corners.
Step 6 – Attach Surfaces or Panels
If you’re including containers or pots into your garden, secure them in their designated spaces. Ensure that all surfaces are smooth and clear of debris.
Step 7 – Sanding and Edge Treatment
If raw wood is visible, sand down any rough edges to avoid injuries. Use a fine-grit sandpaper (100-220) and wipe clean to remove any dust after sanding.
Step 8 – Finish Application
Apply a weatherproof stain or sealer, focusing on wood regions to maximize durability against the elements. Let it dry fully, following package instructions on recoat times.
Step 9 – Plant and Decorate
Fill the container with soil, arranging your chosen plants according to size and color for visual impact. Once planted, decorate your garden with miniatures, stones, and moss to add charm and character.
Step 10 – Final Touches
After your garden is established, add any final touches like twinkling lights, border fences, or additional decor items. Ensure everything is well-positioned and secured.
FAQ Section
What types of plants are best for a fairy garden?
Succulents, small flowering plants, and herbs like thyme or mint work wonders as they don’t take much space and provide beautiful colors and scents.
How often do I need to water my fairy garden?
Watering depends on your climate and the plants used. Generally, check moisture levels regularly; watering weekly is common in outdoor settings.
Can I create an indoor fairy garden?
Absolutely! Choose indoor-friendly plants and consider using trays or decorative bowls to contain your little magical world.
How do I protect my fairy garden from harsh weather?
Add a roof or protective coverings during storms. Also, using weather-resistant materials and placing your garden in a sheltered location can help.
Can kids participate in making a fairy garden?
Yes! It’s a fun and engaging activity for all ages, allowing children to explore their creativity under adult supervision.