
Introduction
Most houseplants we adore are tropical at heart — they thrive with extra humidity. I learned that the hard way when my first fiddle-leaf fig developed dry brown edges during a winter of overzealous heat and dry air. A simple tray trick saved it, and that’s what I want to share: practical, low-cost solutions that actually work.
In this guide you’ll learn 3 Easy Humidity Tray Ideas Using Household Items, why they help, what to use, and how to set them up so your plants perk up without a humidifier. If you enjoy small, budget-friendly plant hacks, you might also like some creative refresh projects; I recently used a few ideas from a favorite home-blog roundup to update a windowsill display—here’s a helpful link to some spring refresh ideas for plant displays that inspired my arrangement.
This article walks through each tray idea, troubleshooting tips, and ways to combine methods safely. You’ll get clear examples and a few real-life notes from my own trial-and-error so you can try these quickly and confidently.
Table of Contents
Benefits Of Humidity Trays
Humidity trays work by creating a localized humid microclimate around the plant without increasing humidity throughout the room. That’s perfect for living rooms, bedrooms, or offices where you don’t want the whole space humidified.
Have you ever noticed tiny beads of water on your plant’s leaves in the morning? That’s often a sign the plant is comfortable with the immediate humidity. Simple trays reduce leaf browning, improve new leaf development, and can even help slow down water stress. Using the keyword here for clarity: 3 Easy Humidity Tray Ideas Using Household Items will give you options to boost local moisture without special equipment.
Benefits at a glance:
- Gentle, passive humidity increase that won’t over-saturate soil.
- Cost-effective: most setups use things you already have.
- Flexible: easy to move, rearrange, or scale up for multiple plants.
- Low maintenance: refill water and clean occasionally.
These benefits make humidity trays an ideal first step before buying a room humidifier or installing a more involved humidity system.
Materials You Already Have
Turning household items into functional humidity trays is straightforward. The next sections detail three practical setups, but let’s look at the materials so you can improvise.
Common Containers
- Shallow baking dishes, cookie sheets, or under-plant catch trays.
- Plastic storage lids, plant saucers, or shallow serving platters.
- A small, shallow roasting pan works great for multiple pots.
Choose containers that are wider than the pot base so the pot sits on a raised layer rather than directly in standing water.
Water-Retention Helpers
- Smooth pebbles, marbles, aquarium gravel, or decorative stones.
- Coarse sponges or cut-up foam blocks.
- Live or dried sphagnum moss if you want a more natural look and light water retention.
These items create an air gap between the pot and the water, which allows moisture to evaporate without saturating roots.
Safe Substrates
- Clean aquarium sand or washed play sand (small amount for leveling).
- Horticultural perlite added sparingly for drainage in very heavy pots.
- Avoid soil, compost, or any material that could mold quickly in a shallow tray.
Having the right mix of container and substrate makes setups durable and less likely to attract pests.
Note: This next section includes one of the practical methods described in 3 Easy Humidity Tray Ideas Using Household Items.
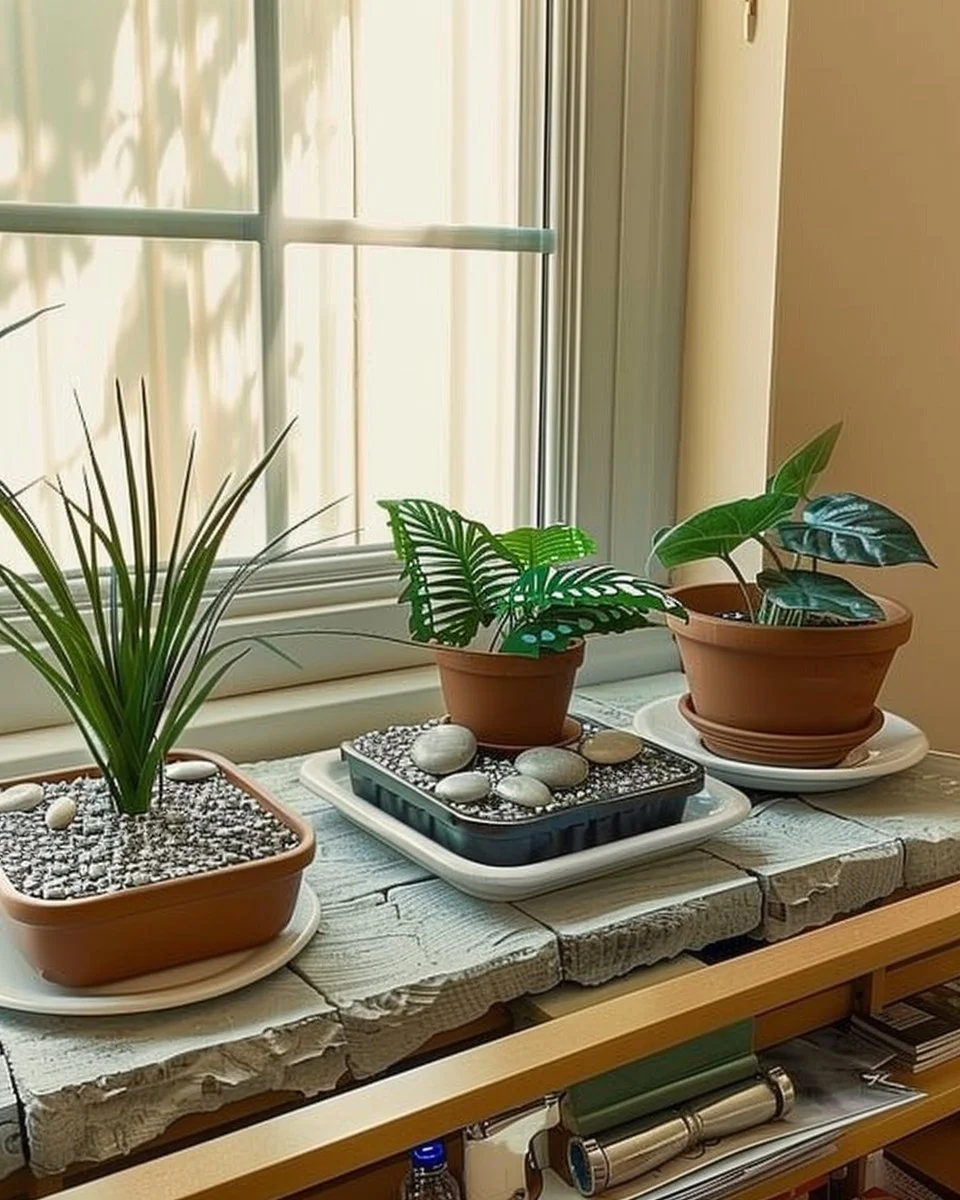
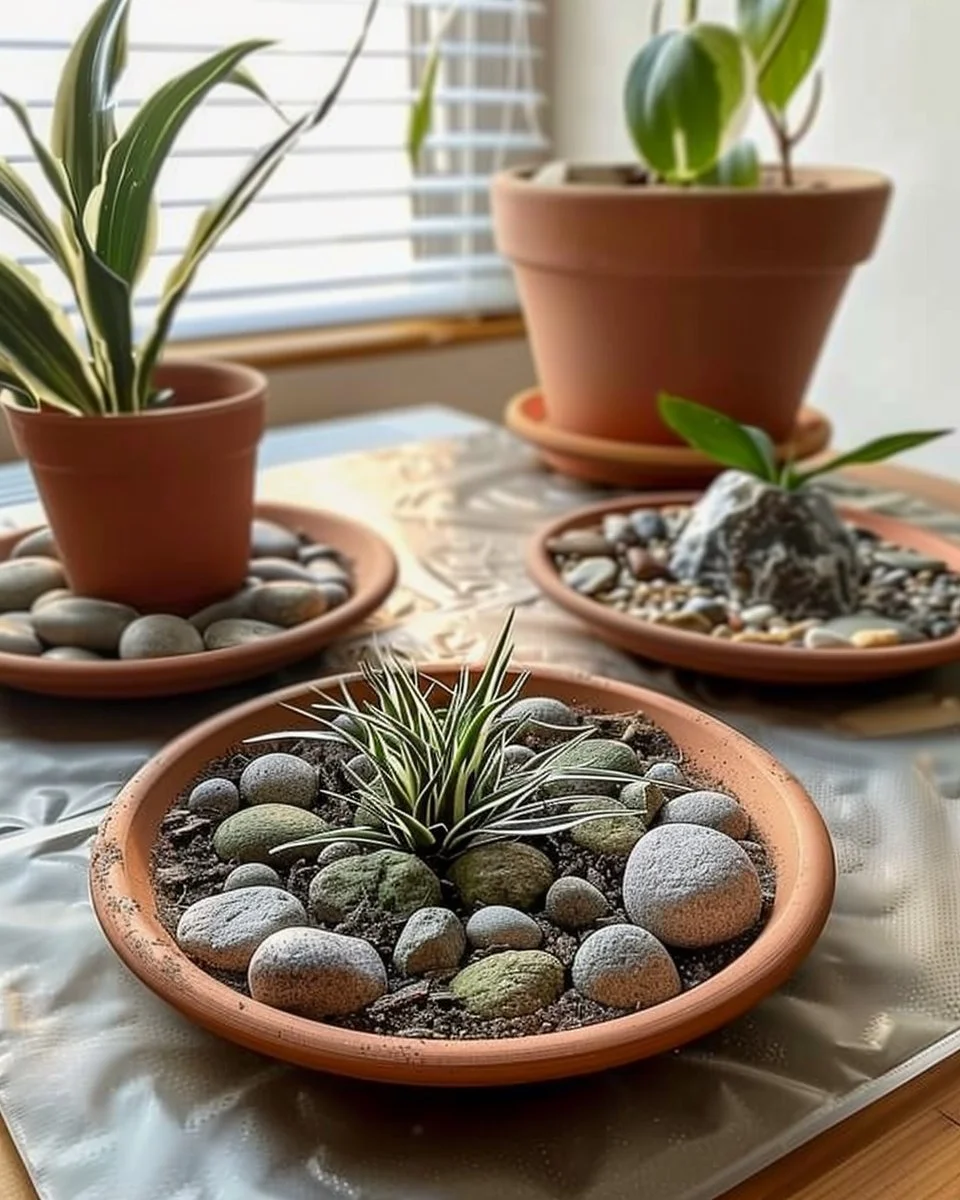
Pebble Tray Setup
The pebble tray is the classic, and for good reason: it’s simple, clean, and effective.
Picking The Right Tray
Select a shallow tray or shallow dish slightly larger than your plant’s pot. Ceramic platters, plastic saucers, or even shallow takeout containers can work in a pinch. The tray should hold a small amount of water (about 1/4 to 1/2 inch) without overflowing when the pot is placed on the pebble bed.
Pebbles And Depth
Fill the tray about 1 to 2 inches deep with clean pebbles or marbles. The idea is to raise the pot above the water line so the pot’s drainage holes do not sit in standing water. Instead, evaporation from the surface around the pot increases humidity.
How to set it up:
- Clean the tray and pebbles first to avoid algae.
- Add pebbles, then pour water until it sits just below the top of the pebbles.
- Place the pot on the pebbles so the base is elevated.
Example: A 6-inch pot on a 9-inch baking tray with a 1.5-inch pebble bed will create a steady, gentle humidity boost around the plant’s leaves.
Placement Tips
- Put these trays near grouped plants or on a sunny windowsill where evaporation is moderate.
- Avoid placing trays where they’ll drip onto furniture. Use a waterproof liner or protective mat if necessary.
- For plants that detest wet feet (e.g., cacti, some succulents), use the tray only during dry months or skip it entirely.
This is one of the simplest entries in 3 Easy Humidity Tray Ideas Using Household Items and often the best first test for improving a plant’s comfort.
Sphagnum Or Sponge Tray Setup
If you want a bit more humidity retention and a softer aesthetic, using sphagnum moss or sponges works beautifully.
Choosing Moss Or Sponge
- Long-fiber sphagnum (live or preserved) holds a lot of water and releases it slowly.
- Clean, dense kitchen sponges (cut to fit) can do the same job in a budget pinch.
- Choose non-scented sponges and rinse them before use.
This method is particularly good for plants that love consistently higher humidity like ferns or Calatheas.
How To Layer
- Place a thin waterproof liner in your tray (optional for easier cleaning).
- Cover the tray floor with a layer of sphagnum or fitted sponges about 1 inch thick.
- Soak the moss or sponges thoroughly, then wring out excess so they’re damp, not dripping.
- Set the pot on top. The damp material will slowly release moisture into the air around the pot.
The keyword here fits naturally: 3 Easy Humidity Tray Ideas Using Household Items includes the sponge/moss approach because it combines easy sourcing with noticeable humidity improvement.
Replenishing Moisture
- Check weekly; top up with water when the material feels less damp.
- Avoid letting sphagnum sit bone-dry for long periods, as it can compress and lose effectiveness.
- Replace sponges every few months to prevent musty smells, and replace sphagnum if it starts to decompose or smell.
This setup is low-profile and less splash-prone than pebble trays, and it looks natural—great for display plants.
Grouping For Microclimates
Sometimes the simplest humidity trick is grouping plants. Placing plants together creates a shared microclimate where transpiration from each plant raises the humidity around neighboring foliage.
Which Plants Benefit
- Tropical species: Philodendrons, Monsteras, Pothos, Calatheas, and ferns.
- Seedlings and cuttings also enjoy the higher, stable moisture for rooting.
- Avoid grouping plants that prefer drying between waterings or those prone to rot (many succulents).
Grouping is one of the three practical approaches in 3 Easy Humidity Tray Ideas Using Household Items—combine trays with clusters for the best effect.
Arrangement Ideas
- Create clusters on a single large tray: several pots on one pebble or sponge tray will raise humidity for the whole group.
- Use a shallow shelf or plant stand: place a tray on the bottom shelf and group plants above; moisture rises to benefit all.
- Add a decorative terrarium-style glass cloche for humidity-sensitive seedlings (vent periodically).
Monitoring Humidity
A small hygrometer is a helpful investment to track conditions. Many hobbyists aim for a localized range of 45–65% relative humidity for most tropical houseplants. If you don’t own one, watch for plant cues: limp new leaves or persistent brown edges signal low humidity; overly wet, limp stems can mean too much humidity or poor air circulation.
Combining trays and grouping creates a layered strategy: trays provide steady evaporation, and grouping concentrates the effect. That’s a practical lesson from trying multiple setups in my own apartment last winter—grouping made the biggest difference for a tiny fern collection.
Troubleshooting And Maintenance
Even easy setups need occasional care. Here’s how to keep things working and avoid common mistakes.
Common issues and fixes:
- Algae or mold on pebbles/moss: Clean trays monthly and refresh the substrate. A mild vinegar rinse for ceramic trays can help; rinse thoroughly afterward.
- Musty smell: Replace sponges and rinse moss. Ensure materials aren’t waterlogged; they should be damp, not stagnant.
- Pests: Standing water can attract gnats if soil is overly wet. Avoid letting tray water become a mosquito or gnat nursery—keep water moving by stirring or changing it.
- Root rot risk: Pots should never sit with soil submerged. If pots are sitting in standing water because the pot is too small for the tray, remove and reset on a higher bed of pebbles or sponge.
How often to refill:
- Pebble trays typically need topping up every 3–10 days depending on temperature and airflow.
- Sponge or sphagnum trays may need water every 7–14 days.
- During winter, evaporation slows, so check less frequently but be mindful of central heating.
Simple hygiene tip: Every month, remove pots, rinse pebbles or replace sponges, then refill. This keeps the system working and your plants healthy.
Extra Tips And Alternatives
- Use a shallow tray with a lid or clear cover for temporary propagation humidity; vent once a day to avoid fungal issues.
- Combine methods: a pebble bed with a dab of sphagnum near the pot base can increase effectiveness without making a mess.
- For aesthetics: add decorative stones on top of sponge to hide it but still allow moisture to evaporate.
- Portable battery-operated humidifiers are an alternative for specific problem plants, but trays are quieter and more eco-friendly.
If you’ve ever wondered which method is “best,” the answer is: it depends on the plant and your tolerance for upkeep. For most people, starting with a pebble tray is the easiest; upgrade to sphagnum or grouping if you want a more stable effect.
Conclusion
Those were practical, low-cost solutions to raise humidity without a dedicated humidifier: pebble trays, sphagnum or sponge trays, and smart grouping. Each method is one of the 3 Easy Humidity Tray Ideas Using Household Items and can be mixed and matched depending on your plants and living situation. Try one, observe for a couple of weeks, and tweak the setup—small changes often yield big improvements.
For a clear, photo-rich walkthrough and additional visual examples of these exact ideas, see this detailed guide: 3 Easy Humidity Tray Ideas Using Household Items – thetidyroot.com
FAQs
Q: How long before I see results from using a humidity tray?
A: Many plants respond within 1–3 weeks—look for less browning on new leaf edges and fuller new growth.
Q: Can humidity trays cause root rot?
A: Only if pots sit directly in standing water. Always elevate the pot above the waterline (pebbles or sponge) to avoid saturated soil.
Q: How often should I change the water in a pebble tray?
A: Every one to two weeks is fine; rinse pebbles monthly to prevent algae buildup.
Q: Are these trays safe for all houseplants?
A: Most tropical houseplants benefit. Avoid frequent use for succulents and cacti that prefer dry air.
Q: Can I use essential oils in tray water to scent my room?
A: I don’t recommend it. Oils can coat leaves, potentially damaging plant stomata and altering water evaporation.
Q: Is it okay to put trays on wooden furniture?
A: Use a waterproof mat or tray liner to protect furniture from spills and moisture stains.
Q: How do I prevent gnats if I use trays regularly?
A: Keep soil surface dry and avoid overwatering plants. Change tray water regularly and avoid standing, stagnant water for long periods.
Q: Which plants benefit the most from these methods?
A: Ferns, Calatheas, Monsteras, Alocasias, and many aroid varieties show clear improvement with raised humidity.
Q: Can I use a clear cover instead of a tray?
A: For propagation or temporary humidity, a clear cover works well. For long-term plant health, trays or grouping are safer and provide airflow.
Q: What’s the simplest method to start with?
A: A pebble tray is the fastest and least fussy way to see if your plants respond to extra local humidity.