
Introduction to Easy Worm Composting & DIY Bokashi Bucket
Have you ever thought about how many food scraps end up in the landfill and contribute to growing waste problems? The trend of sustainable living has led many to seek out eco-friendly solutions, and one standout method is Easy Worm Composting & DIY Bokashi Bucket. Not only does it help reduce waste, but it also transforms your organic materials into high-quality fertilizer for your plants. Whether you have a bustling backyard garden or a modest indoor plant collection, this project can take your gardening game to another level.
So, what makes Easy Worm Composting & DIY Bokashi Bucket special? It’s practical and affordable, allowing you to create a self-sustaining cycle right at home. This project requires minimal tools and can be accomplished in a weekend, making it perfect for beginners and seasoned gardeners alike. With a modest budget, you’ll be able to turn kitchen scraps into “black gold” while participating in the larger movement of reducing your carbon footprint.
Imagine the satisfaction of knowing that you are enriching your soil while diminishing what your household contributes to landfills. This project is not only rewarding for your plants but also for your spirit as you embrace a more sustainable lifestyle. Ready to dive into the world of composting? Let’s explore the key benefits and specifications for this impactful project.
Table of Contents
Key Benefits of Easy Worm Composting & DIY Bokashi Bucket
Why You’ll Love This Build
- Space Efficiency: Perfect for small living spaces or backyards.
- Cost-Effective: Reduces waste and saves money on fertilizers.
- Simplicity: Easy to set up with basic tools and materials.
- Durability: Constructed materials stand the test of time.
- Versatility: Can accommodate various types of kitchen scraps.
- Sustainable: Encourages eco-friendly living and waste reduction.
What Makes It Stand Out
Easy Worm Composting & DIY Bokashi Bucket is not just about composting; it’s about creating a nutrient-rich habitat for worms, which accelerate the decomposition process. The worm composting system eliminates the odor and mess often associated with traditional composting methods. Unlike store-bought compost bins, this DIY solution gives you flexibility in terms of size and design. You can customize it to fit your home and needs while ensuring it complements your gardening style.
Plus, with a Bokashi bucket, you can compost all kinds of kitchen waste—meat, dairy, and fermented scraps—unlike standard composting methods, which often exclude these items. It’s a game-changer in the realm of composting, making it easier for anyone to get involved in sustainable practices.
Project Specs for Easy Worm Composting & DIY Bokashi Bucket
At-a-Glance Details
- Skill Level: Beginner
- Estimated Time: 2–3 hours
- Estimated Cost (USD): $30–$50
- Dimensions: 12″ x 12″ x 30″ (30.5 cm x 30.5 cm x 76.2 cm)
- Indoor/Outdoor Suitability: Both
- Tools Needed: Drill, saw, measuring tape
Materials and Tools for Easy Worm Composting & DIY Bokashi Bucket
Complete Materials List with Measurements
- Plastic storage bin (38 qt): 1
- Drill bits (1/4″ for air holes): 1
- Wood or plastic for lid: 1 sheet, approx. 12″ x 12″ (30.5 cm x 30.5 cm)
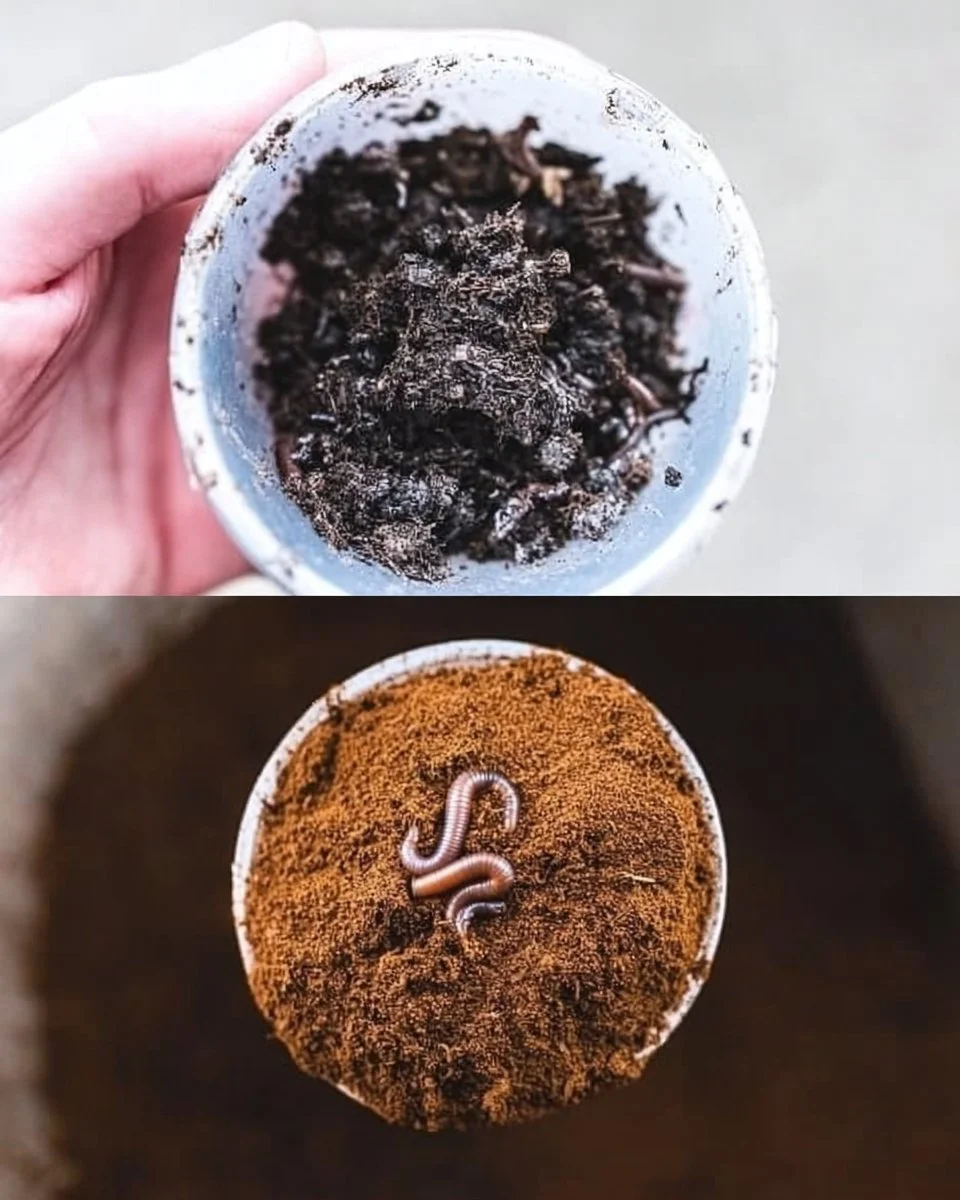
- Worms (red wigglers): 1 lb (450 g)
- Bokashi bran: 1 lb (450 g)
Complete Tools List
- Drill: For making holes in the compost bin.
- Saw: For cutting the lid material, if needed.
- Measuring tape: For accurate measurements.
- Screwdriver: Basic assembly.
- Clamps: Optional, for securing materials during assembly.
Substitutes and Alternatives
If you don’t have access to red wigglers, you can seek local resources or worm farms that sell them. Any organic materials can be composted; if Bokashi bran is unavailable, regular composting materials can still work but may limit your options. For the container, if you have a sturdy cardboard box, it can serve as a temporary solution until you find a plastic bin.
Cut List and Measurements for Easy Worm Composting & DIY Bokashi Bucket
- Lid: 12″ x 12″ (30.5 cm x 30.5 cm)
- Air Holes: Drill holes throughout the sides, spacing evenly about 2″ apart.
Safety and Prep for Easy Worm Composting & DIY Bokashi Bucket
Always use personal protective equipment (PPE), such as gloves and masks, when working with tools. Ensure your workspace is clean and organized to avoid accidents. Double-check measurements before cutting materials to guarantee accuracy. If you’re using a drill, make sure to clamp down any pieces securely to avoid slipping while you work. Adequate ventilation is also a must, especially if you’re doing the DIY project indoors.
How to Build Easy Worm Composting & DIY Bokashi Bucket – Step-by-Step Directions
Step 1 – Prep and Layout
Start by gathering all your materials and tools in a well-lit workspace. Use the measuring tape to mark where you will drill air holes on the sides of your plastic bin. Ensure the bin is clean and dry.
Step 2 – Cut and Label Pieces
If using a separate lid material, cut it down to the correct 12″ x 12″ size. Label it with a marker so you can identify it easily during assembly.
Step 3 – Dry Fit and Mark Joinery
Before drilling any holes, do a dry fit with all components. Mark the spots where you will need to drill holes using a pencil. This precaution helps you visualize the final setup.
Step 4 – Assemble the Frame/Body
Begin by drilling the air holes into the sides of the bin. Ensure the holes are evenly spaced and not too close to the bottom to prevent moisture from dripping through. Assemble the lid if required; it should fit snugly over the bin.
Step 5 – Reinforce and Square
After ensuring everything fits well, check the alignment of the lid with the sides of the bin. If needed, reinforce joints using screws for better stability. Squaring up the sides ensures the bin can hold moisture and worms without collapsing.
Step 6 – Attach Surfaces or Panels
If applicable, attach any additional panels or surfaces using the screwdriver and screws. Ensure all parts are secure so that no materials can escape.
Step 7 – Sanding and Edge Treatment
Smooth any rough edges of the bin and lid using sandpaper to prevent injury. This step also ensures that the bin works as intended without snagging.
Step 8 – Finish Application
Optional: If you’re keen to extend the life of your bin, consider applying a water-resistant coating to the outside. Follow the manufacturer’s instructions for any sealers or paint. Allow ample time for drying.
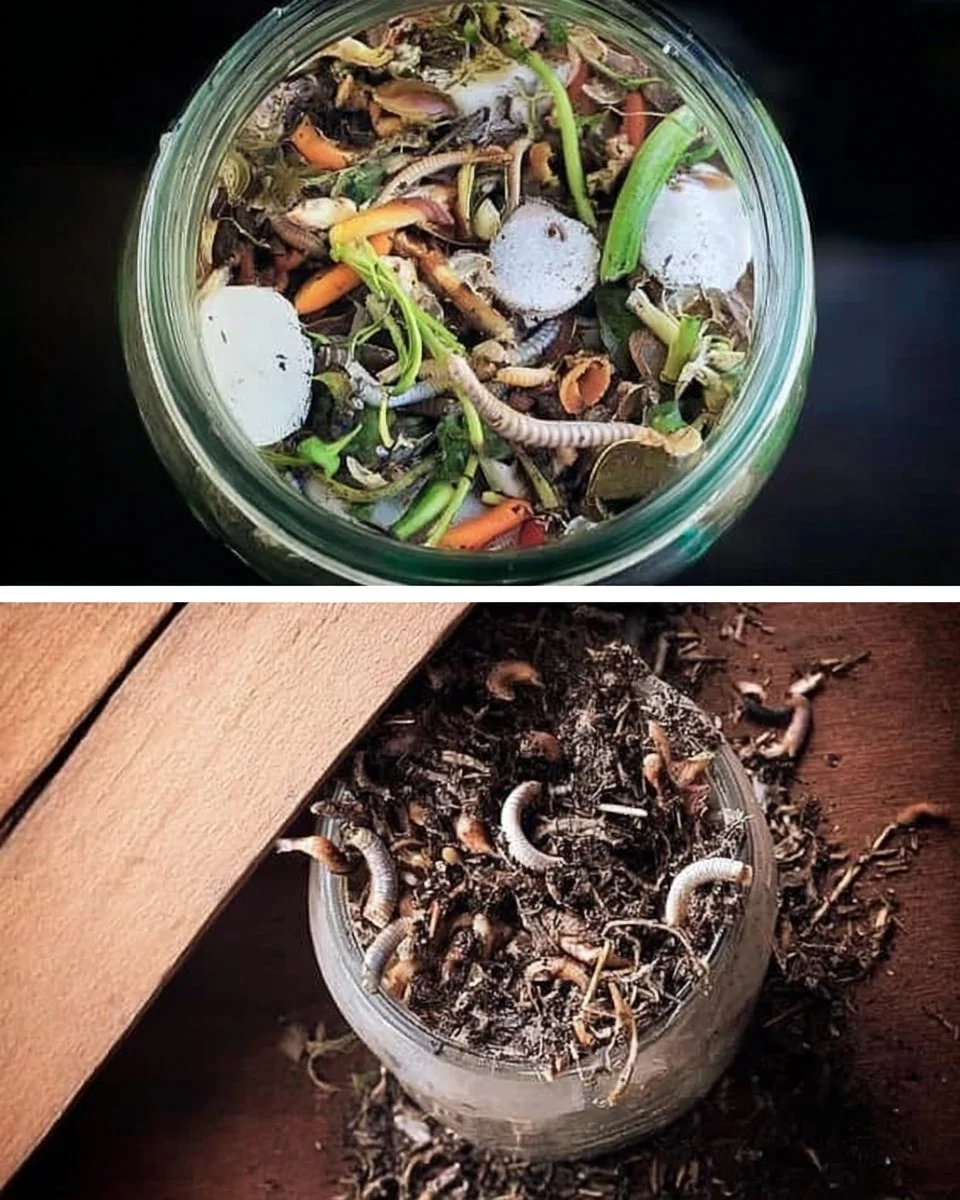
Step 9 – Adding Worms and Composting
Place your red wigglers into the newly built bin along with the Bokashi bran and some bedding material. This creates an inviting environment for the worms to thrive.
Step 10 – Maintenance and Usage
Check the moisture level regularly and add water when necessary. Remove compost material as it matures into nutrient-dense fertilizer.
FAQ about Easy Worm Composting & DIY Bokashi Bucket
How do I get started with worm composting? You simply need a bin, some worms, and to add organic scraps periodically.
Can I use any kind of worms for composting? Red wigglers are the best type for composting, as they thrive in organic materials.
How often should I add kitchen scraps? Aim to add scraps every few days for the best results, but avoid overloading to prevent odors.
How do I maintain moisture in the bin? Check regularly and add water as needed. The contents should feel slightly damp but not soggy.
Can I compost meat and dairy in the Bokashi bucket? Yes, one of the advantages of the Bokashi method is its ability to handle these items, unlike traditional composting.
What should I do if the bin smells? Check for excess moisture and reduce the amount of kitchen scraps being added. Adjust aeration if necessary.